Rob’s Recipe of the Week: Mini stuffed squash
I can’t remember the name of the mini squashes we got this week, but I felt they were too special just to cube and roast like normal, so here I’ve found a fun stuffed squash recipe which although aimed at a different variety, I hope will translate across. Enjoy!
INGREDIENTS
3 sweet dumpling squashes
1 tablespoon olive oil
1 small onion, diced (about 1/2 cup)
1/4 cup shelled pistachios, coarsely chopped
8 dates, coarsely chopped (about 1/4 cup)
1 teaspoon lemon zest
1 teaspoon cinnamon
1 cup cooked quinoa
Salt and freshly ground black pepper
INSTRUCTIONS
Preheat oven to 190C.
Cut squash in half and scoop out seeds. (The seeds can be roasted like pumpkin seeds.)
Place squash face-down in an oiled baking dish. Bake until tender when pierced with a knife, about 30 minutes. Remove squash from oven but keep oven on.
Prepare the stuffing while the squash is baking. Heat oil in a medium saucepan over medium heat. Add onions and sauté until onion is translucent. Add pistachios, dates, lemon zest, and cinnamon and sauté for another minute. Stir in the cooked quinoa and season to taste with salt and pepper.
Turn the squash upright in the baking dish and stuff with the quinoa mixture.
Cover dish and bake for another 20 minutes.
Serve warm, garnished with extra pistachios or lemon zest, if desired. The peel of sweet dumpling squash is generally tender enough to be eaten.
From https://www.thekitchn.com/recipe-quinoa-stuffed-sweet-du-72643
Rob’s Recipe of the Week: October, American style
This year I thought I would do something different with my Canalside pumpkin, so I’ve been looking up pumpkin pie recipes. This may suit small shares better, as some reading has suggested smaller pumpkins are better suited to pie, but I’ll be trying anyway with my massive medium share pumpkin and probably making soup out of the remainder.

Pumpkin puree (pie recipe to follow below, use the remainder of this for soup)
4-6lbs (1.8-2.8kg) pumpkin makes 5-6 cups puree, 2 cups needed for pie
Preheat oven to 200degC then rinse and pat dry the pumpkin. Cut from stem to end, but don’t try to cut through the stem (it’s too tough). When you’ve cut through the pumpkin, just pull each half apart. Do this in two parts. Cut one side from the stem down to the bottom of the pumpkin. Remove the knife, rotate the pumpkin to the opposite side then do the same. When there is a slit down both halves of the pumpkin, put down the knife and pull the halves apart. They should separate at the stem.
Scoop out the seeds and most of the stringy bits. Lightly season the inside of the pumpkin halves with salt then place cut-side-down onto the baking sheet. Bake until the pumpkin can easily be pierced with a knife in several places and the flesh is pulling away from the skin, 45 to 60 minutes.
Cool until you can safely handle the halves then scoop out the soft flesh into a food processor. Process until very smooth, 3 to 5 minutes.
Pumpkin Pie
Ingredients:
Sweet shortcrust pastry (350g approx), chilled
About 2 cups; 450g pumpkin puree
3 large eggs
1 and 1/4 cups (250g) packed light or dark brown sugar
1 Tablespoon (8g) cornstarch
1/2 teaspoon salt
1 and 1/2 teaspoons ground cinnamon
1/2 teaspoon ground ginger
1/4 teaspoon ground or freshly grated nutmeg
1/8 teaspoon ground cloves
1/8 teaspoon fresh ground black pepper
1 cup (240ml) double cream
1/4 cup (60ml) milk
egg wash: 1 large egg beaten with 1 Tablespoon milk
Method:
For the pumpkin pie filling: Whisk the pumpkin, 3 eggs, and brown sugar together until combined. Add the cornstarch, salt, cinnamon, ginger, nutmeg, cloves, pepper, cream, and milk. Vigorously whisk until everything is combined. Filling will be a little thick.
Preheat oven to 190°C
Roll out the chilled pie crust: Remove 1 disc of pie dough from the refrigerator. On a lightly floured work surface, roll the dough out into a 12-inch circle. Make sure to turn the dough about a quarter turn after every few rolls. Carefully place the dough into a 9-inch pie dish. Tuck it in with your fingers, making sure it is smooth. With a small and sharp knife, trim the extra overhang of crust and discard. Crimp the edges with a fork or flute the edges with your fingers, if desired. Brush edges lightly with egg wash mixture. Line the pie crust with parchment paper. (Crunch up the parchment paper first so that you can easily shape it into the crust.) Fill with pie weights. Make sure the weights are evenly distributed around the pie dish. Pre-bake the crust for 10 minutes. Carefully remove the parchment paper/pie weights.
Pour pumpkin pie filling into the warm pre-baked crust. Only fill the crust about 3/4 of the way up. (Use extra to make mini pies with leftover pie dough scraps if you’d like.) Bake the pie until the center is almost set, about 55-60 minutes give or take. A small part of the center will be wobbly – that’s ok. After 25 minutes of baking, be sure to cover the edges of the crust with aluminum foil or use a pie crust shield to prevent the edges from getting too brown. Check for doneness at minute 50, and then 55, and then 60, etc.
Once done, transfer the pie to a wire rack and allow to cool completely for at least 3 hours.
Adapted from: https://www.inspiredtaste.net/35527/easy-pumpkin-puree-recipe/ and https://sallysbakingaddiction.com/the-great-pumpkin-pie-recipe/
Job opportunity at Canalside – main grower
Canalside Community Food, a pioneering CSA based outside Leamington Spa, is looking for a new main grower. We are seeking an experienced grower to join our team producing organic vegetables and fruit throughout the year for our community of nearly 200 members.
The successful candidate will work in collaboration with the assistant growers, administration team and seasonal staff, as well as the steering committee and volunteers. The main grower will take a key role in organising and leading the day-to-day management of the farm which includes organising and leading volunteer work mornings, working from and adapting an established rotation and cropping plan, operating a tractor and various manual tools, and reporting to the steering committee.
We are looking for somebody to commit to this fantastic opportunity for at least three seasons. We currently have 7 acres of field scale vegetables, 7 large polytunnels for protected cropping and a 2 acre orchard of top and soft fruit. This position is full-time (37.5 hours per week March-October, 30 per week Nov-Feb) with basic salary of £20,229, statutory holiday allowance and a pension offered.
More details and full job description here
Applications by CV and covering letter to mail@canalsidecommunityfood.org.uk: deadline – noon on Monday 16th November 2020.
Interviews on 28th November to start early January 2021 or asap thereafter.
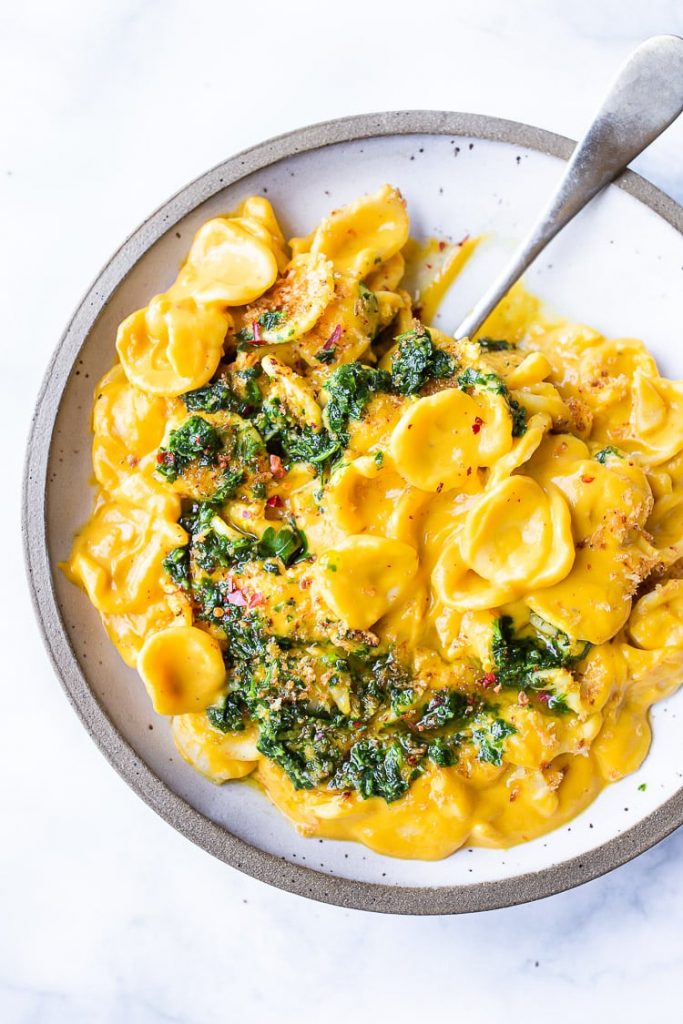
Rebecca’s Recipe of the Week: Pasta with Creamy Carrot Miso Sauce
Another very good recipe from Slyvia Fontaine. The creamy carrot sauce colours the pasta a beautiful gold, while the fresh, herby gremolata adds vibrant green. Toasted breadcrumbs provide a contrasting crunch against the richness of the sauce. You would certainly not guess that this is vegan, but you’ll see right away how beautiful it looks in your bowl. The flavours work really well together and I recommend this highly.
Pasta with Creamy Carrot Miso Sauce
Serves 4
Ingredients
Carrot Miso Sauce
2 shallots, rough chopped (or 1/2 an onion)
3 large garlic cloves, rough chopped
2 tablespoons olive oil
150g carrots
450ml water
40g cashews
Freshly-ground pepper
3 tablespoons white miso paste
Gremolata
60g fresh coriander or parsley (Sylvia notes you can also use carrot tops)
1 tablespoon lemon zest ( zest from one medium lemon)
¼ teaspoon salt
1 fat garlic clove
70-100ml olive oil
Toasted Breadcrumbs
1 thick slice of good bread, grated, to make about 50g breadcrumbs
250g pasta (Sylvia Fontaine recommends orecchiette)
Instructions
Cook the sauce: Heat oil in a medium pot, over medium heat. Saute shallot and garlic until fragrant and golden, about 5 minutes, stirring often. Add carrots, cashews, water, and pepper and bring to a boil. Cover, lower heat to low and simmer gently until carrots are fork-tender, about 15 minutes. Stir in the 3 tablespoons of miso and let cool for 5-10 minutes.
While the carrots simmer make the Gremolata: Place coriander or parsley, lemon zest, salt and garlic in a food processer and pulse repeatedly until finely chopped. Add 70ml oil, pulsing a few more times until incorporated (but not too smooth). Add more oil if you prefer a looser version.
Now make the breadcrumbs: place the breadcrumbs in a frying pan over medium heat and toast, stirring frequently, until the crumbs are golden brown. Set aside.
Bring some water to the boil, and cook the pasta according to the packet instructions.
While the pasta is cooking blend the sauce: place the carrot-cashew sauce in a high-speed blender or food processor and blend on the lowest setting, gradually increasing speed, until fully blended, creamy and silky smooth, which will take between one and two minutes. Slyvia writes: ‘Take your time here and get it SMOOTH!!!’
Drain the pasta and pour the sauce over. Heat it gently if needed. Taste and adjust salt.
Divide among bowls, and sprinkle with toasted bread crumbs and spoon the gremolata over top. Enjoy with a glass of chardonnay.
Recipe adapted from Sylvia Fontaine, Feasting at Home
2020 – October news: Rat Attack
Here at Canalside we live in harmony with all of nature’s fauna and flora. However, some animals are getting a bit too harmonious for my liking: someone, or something, has discovered our squashes (which are seasoning in tunnel 3 just now) and invited all its friends and family for a squash party! We suspect the rat, so have set up live traps which so far have failed to entice the offender. Luckily not too many fruits have been lost so far.
Dom van Marsh
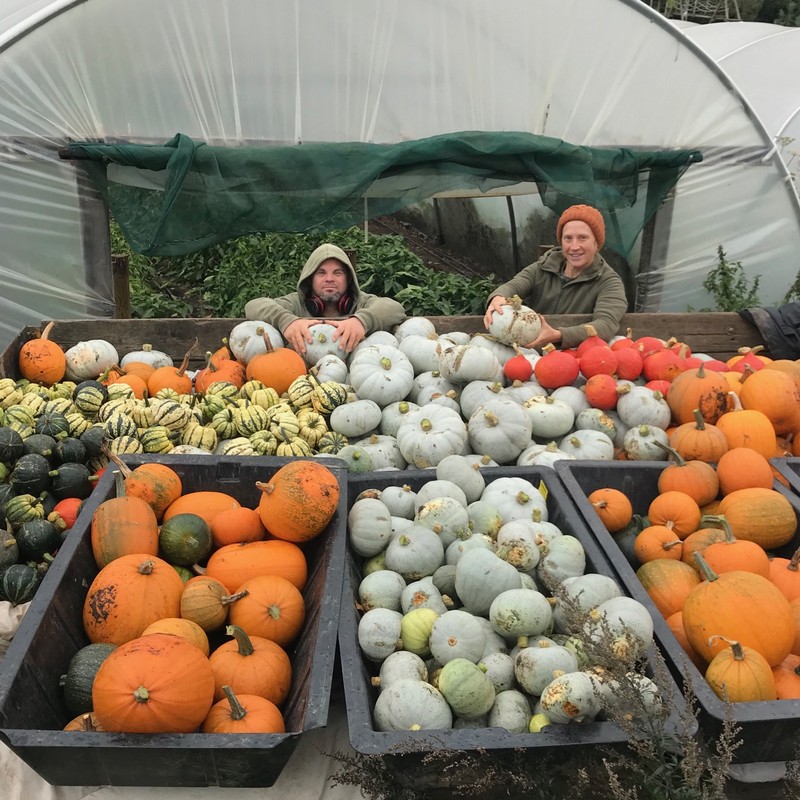
The squash haul being unloaded 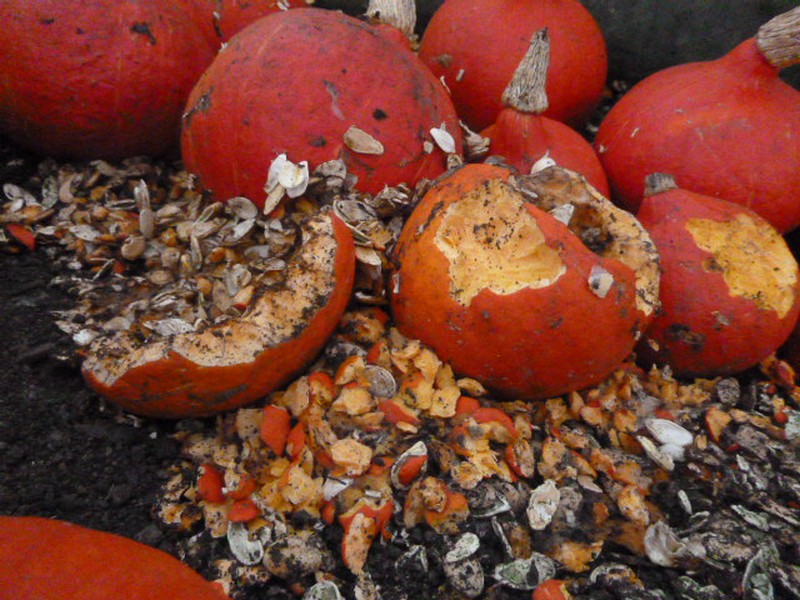
The post-party mess…!
Rob’s Recipe of the Week: A reason to buy mace?
Since starting recipes I tried my hardest to avoid running a “mashed swede” recipe but it had to happen eventually… This one looks good, although I’m going to have to go to the shops and buy some mace!
Honey crushed swede
Ingredients
2 large swede , cut into 3cm chunks
1 tsp ground mace
100g butter
2 tbsp clear honey
Method
Put a pan of salted water on to boil. Add the swede and simmer for 20-25 mins until tender. Drain the swede, tip back into the pan and add the mace, butter and honey. Season and crush everything together gently with a potato masher.
from: BBC Good Food
Rebecca’s Recipe of the Week: Peas (and Salmon)
Peas cooked with onions and butter make an excellent dish to eat on their own. Add some pan-seared salmon fillets and you have an easy and very delicious meal.
(To pan-sear, dry the salmon carefully and then season liberally with salt. Heat a little neutral oil in a skillet, and when it is hot add the salmon, skin-side down. Press it into the pan with a fish so that it makes good contact with the heat. Cook, without moving the fish, for about 3 minutes, and then flip it over to cook the other side. Cook for an additional 1-4 minutes, depending on how cooked you like your fish.)
Peas with Parsley, Thyme, Butter and Onions
Serves 4 as part of a larger meal.
Ingredients
2 tablespoons neutral oil (rapeseed, sunflower seed etc.)
1 giant Canalside spring onion, thinly sliced (use the whole thing including the dark green leaves)
½ teaspoon salt
1/2 cup white wine
1 cup chicken stock
4 cups frozen (or fresh) peas
4 tablespoons butter
¾ cup fresh parsley, roughly chopped
5 springs of fresh thyme, roughly chopped
Preparation
Heat the oil in a large frying pan over medium heat. Add the sliced onion and the salt. Reduce the heat to low and cook until the onion is translucent and soft, but not brown. Add the wine and allow to reduce until almost completely dry.
Add the stock and bring to a boil. Add the peas and butter and cook until the stock has reduced, and the sauce is thick and silky with butter. Then add the parsley and thyme check for salt and pepper, and serve.
Recipe adapted from Abra Berens, Ruffage: A Practical Guide to Vegetables (2019).
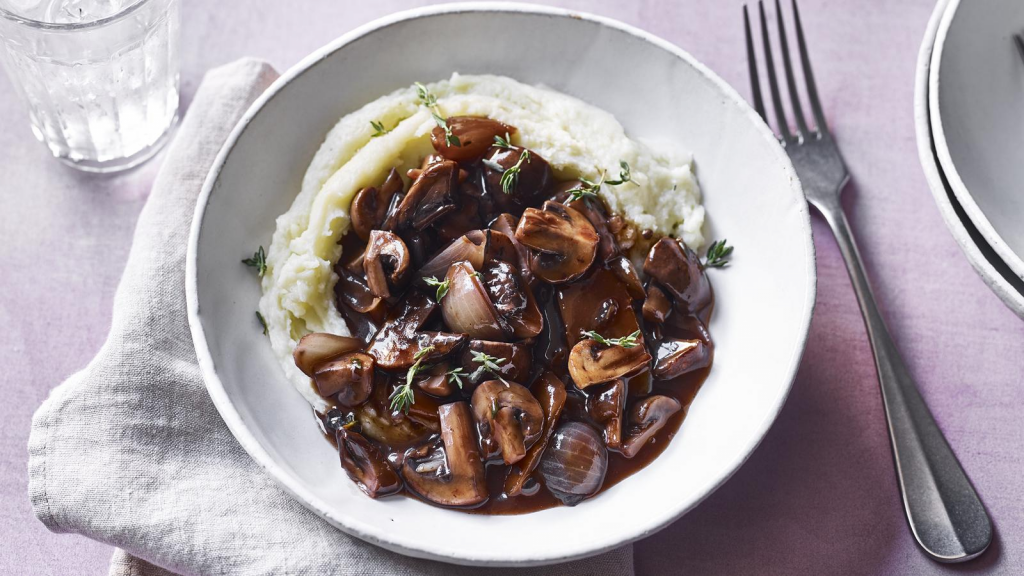
Rob’s Recipe of the Week: Fast (and veggie) Bourguignon
You’ll have to nip to the shops for some mushrooms but otherwise, put with mash and greens, this recipe makes good use of lots of this week’s share. I’ve never made bourguignon so I’m looking forward to it!
Mushroom bourguignon
Ingredients
1½ tsp olive oil
3 shallots, peeled, quartered and layers separated
1 large carrot, peeled and cut into slices on an angle
100g/3½oz button mushrooms, quartered
50g/1¾oz chestnut mushrooms, quartered
3 Portobello mushrooms, roughly chopped
7 fresh thyme sprigs, leaves only, or 1½ tsp dried thyme
3 garlic cloves, finely chopped
150ml/¼ pint fruity vegan red wine
200ml/7fl oz vegetable stock
2 bay leaves
1 tbsp tomato purée
1 tsp yeast extract
1 tbsp cornflour, or plain flour
salt and freshly ground black pepper
Method
Heat the oil in a heavy-based saucepan over a medium heat. Add the shallots and carrot and fry gently for 5 minutes.
Add all the mushrooms and most of the thyme and cook for 5–6 minutes (note, an alternative is to dry fry the mushrooms before the other ingredients – they cook in their own juices, enhancing the flavour). Add the garlic and fry for a further minute.
Add the wine and bring to the boil. Simmer for 2 minutes, then turn the heat down and add the stock, bay leaves, tomato purée and yeast extract and stir. Sift in the cornflour and ½ teaspoon salt and whisk in well.
Cook for 7–8 minutes, then season with salt and pepper and add the rest of the thyme if preferred.
Serve with creamy mashed potatoes or a crunchy slice of crusty bread.
Taken from: BBC Good Food
2020 – September news: Skinned
‘To skin’ is one of those unusual verbs with two meanings that are the complete opposite of one another. The skin a rabbit is to remove the skin, but to skin a polytunnel is to put it on – as the land team (finally!) did to tunnel 1 on Monday. The main reason to replace the polythene cover is about opacity more than anything else – you can ‘clearly’ see this by comparing the transluscent new cover of tunnel 1 with its 13 year old, virtually opaque neighbour. This will give much better crop growth, particularly in winter. Canalside member Eleanor made a fantastic short video of the work, which you can view on vimeo.
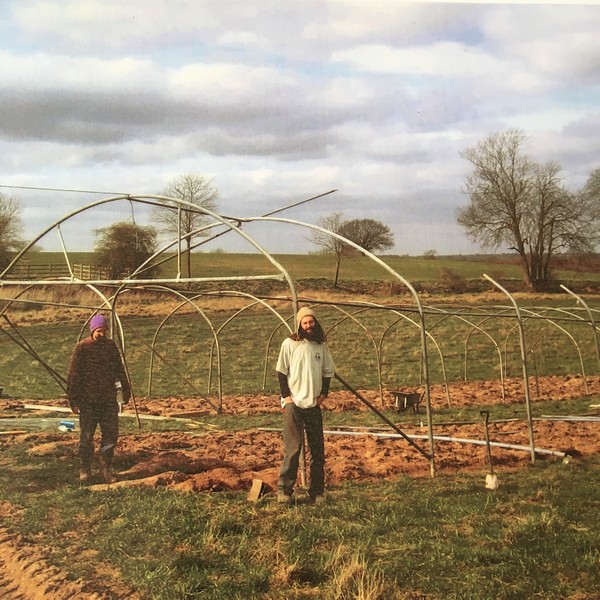
Tunnel 1 – ready for its first skinning
Winter 2006/07 – photo Tom Ingall
Second skinning preps complete 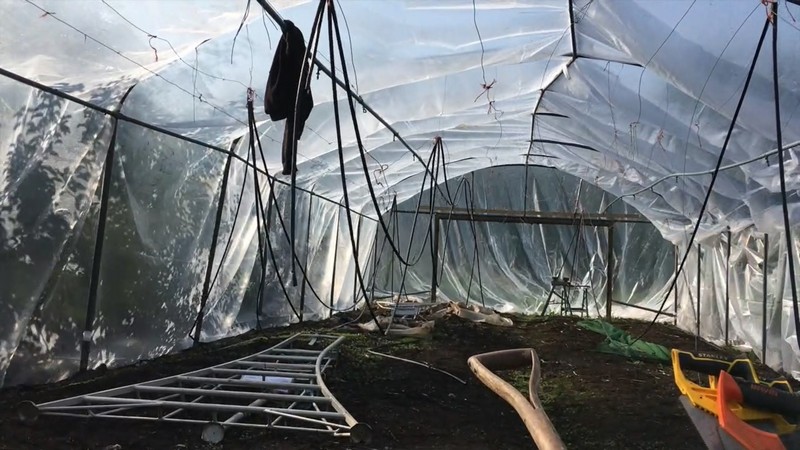
Watch the video of the skinning process
Credit to Eleanor Brown
Rebecca’s Recipe of the Week: Grilled Corn
When I was growing up in New York State, fresh corn on the cob was a familiar summertime treat. In my family we always, always, ate it boiled, with butter, salt, and pepper, and that is indeed an excellent way of preparing this delicious vegetable. (Just to be clear, you should boil your corn for no more than about five minutes, in plenty of water.) Here, however, is another equally excellent way to cook corn.
Grilled Corn
Serves 2
Ingredients
2 ears of corn
2 tablespoons rapeseed or other oil
1 teaspoon Spanish smoked paprika (sweet or hot, as you prefer)
½ teaspoon salt
Freshly-ground black pepper, to taste
Preparation
Preheat your grill to maximum heat.
Meanwhile, shuck your corn: peel away and discard the outer leaves and delicate thread-like silk.
Mix the oil, paprika and salt together and brush over the ears of corn.
Place the corn under the grill and grill for about 10 minutes, turning regularly, until it is a beautiful golden colour all over.
Remove from the grill, grind some black pepper over the cobs, and eat alongside your quelites a la mexicana or anything else that strikes your fancy.