Veg in the Spotlight: Autumnal Greens
We’re coming into the season where different types of greens are once again going to make a more pronounced and regular appearance in the veg, now that the spell of frequent shares of mixed lettuce has passed. We’ll still be seeing lettuce from time to time. Check out the recipes suggested back in June if you need inspiration for using your lettuce. The greens we’ll be seeing more often again will include New Zealand spinach (already producing well and for a little while), chard and different types of kale (each with their own particular features: flat leaved, slightly sweet Red Russian kale, grass-green curly kale, dark green, mega iron-rich cavolo nero).
Known officially as tetragon, and having a large number of other nicknames, New Zealand spinach is a relatively recent addition to the range of veg grown at Canalside. It has a flavour and texture much like perpetual spinach (though the stems are more robust), and has the advantage of being great to grow in late summer and early autumn because it is much less prone to bolting (sending up a flower head and going to seed) in warm/hot weather.
Chard (also known as Swiss chard – with white ribs – and rainbow chard – with white/yellow/pink ribs) is somewhat like spinach/NZ spinach though it has a slightly earthier flavour and slightly more robust texture needing a slightly longer cooking time.
Kale is a member of the brassica (cabbage) family, so is full of vitamins, minerals and antioxidants. Brassicas are also the only fruit/vegetable source of glucosinolates, which are the sulphur containing compounds that have been linked to many health benefits including reduced incidence of some cancers. Cavolo nero is the most robust and is therefore ideal for heartier dishes and stir fried.
Any recipe that mentions any of these vegetables could use any of the others – you just might need to adjust the cooking time a bit and accept that the finished flavour may be slightly different if you have used a substitution. Below are some ideas that specifically mention the greens you can expect in your share in the coming weeks. They’re also perfect for adding to any daal, curry or stir fry recipe to up the nutrition and add a pop of green.
Recipes for New Zealand spinach are limited online as it isn’t a very widespread vegetable, although it seems to be growing in popularity in culinary circles! Here are some ideas which could give you some inspiration:
Japanese-Style New Zealand Spinach
Vietnamese-Style New Zealand Spinach
Here’s a very simple pasta recipe with few simple ingredients
From one German man’s bike travels in New Zealand, a gratin recipe
Braised NZ spinach with garlic (and some unusual/interesting ingredients to season it)
BBC Good Food has a delicious sounding array of recipes that use chard, including:
Chard, squash and parmesan tart
Swiss chard gratin
Chick pea and chard tamarind curry
Morrocan chard and lamb pan-fry
The River Cafe’s winter minestroni
There’s a wide range of recipes for kale with an international flavour, collated by Olive Magazine, which includes:
Kale crisps with smoky paprika sal
Sausage and lentils with cavolo nero
Kale, chilli and ricotta calzone
Kale hush puppies with lemon aïoli
Kale fiorentina pizzas
Plus a number of different salads using kale
As always, there is also a wealth of ideas in The Boxing Clever Cookbook (easily available secondhand for a few pounds) – 19 spinach recipes which could be made with New Zealand spinach, and 15 for curly kale, which could be adapted for other types of kale. Dips, bakes, risottos, sauces, daals and much more – it’s all covered in this one book for these greens. Interestingly there are none for chard!
For recipes for the different greens that Rebecca, Rob, Pip or guest contributors have tried and shared, go to the blog on our website here
https://www.canalsidecommunityfood.org.uk/about-canalside/blog/
or click on one of the links below
Spinach
Chard
Kale
If you have miscellaneous items to use in your fridge, and can’t find a recipe to match, you could try out the Oddbox Recipe Generator!
A Recipe from Rebecca: Cumin-Scented Greens with Eggs, Feta, Lemon and Herbs
Shakshuka usually consists of eggs poached in a spicy tomato sauce. This is a green version, where the eggs are poached on top of a savoury mixture of cumin-scented greens, and then topped with feta, lemon and herbs. Serve it with good bread and some harissa if you’d like to spice it up a bit. Red or green, shakshuka is apparently a popular North African and Middle Eastern breakfast dish. It is also very nice for dinner, and uses only one pan.
We made it with some amazing duck eggs, which are huge and extra unctuous, so if you happen to have some lying around this is a good opportunity to use them. Ordinary eggs will be delicious too, though.
Green Shakshuka

Serves 2
Ingredients
3 tablespoons olive oil
1 large onion, roughly chopped
½ teaspoon salt
2 teaspoons cumin seed
1 teaspoon coriander seed
2 large garlic cloves, sliced thin
650-ishg greens (spinach, chard, spring greens, or a mixture), chopped
25g coriander, dill, mint, parsley, or a mixture, chopped
a wineglass (about 200ml) of white wine, or use water
2-4 eggs
100g feta, crumbled
half a lemon
Harissa and crusty bread, to serve
Method
Over medium heat, warm the oil in a frying pan and add the onion and salt. Reduce the heat to low and cook 5-10 minutes, or until the onion has softened.
While the onion is cooking toast the cumin and coriander seeds in a dry frying pan until fragrant. Keep an eye on it so it doesn’t burn. Set aside to cool a little and then grind it in a mortar and pestle (or use pre-ground spices).
Increase the heat back to medium and add the ground spices and garlic to the pan with the onion and stir for another minute or two, until it smells good.
Add the greens and most of the herbs—but keep a big handful of the herbs aside to use for a garnish. Stir everything together and sauté until the greens begin to wilt a bit. Add the wine or water, and cook for another 8-10 minutes, or until the greens are tender.
Once the greens are tender, use a spoon to create two to four little nests in the mass of cooked greens—one for each egg you intend to use. Crack each egg on the side of the pan, one at a time, and slide it into its nest. Cover the pan and cook for 4-6 minutes, or until the whites have set and the yolks are to your liking.
Remove from the heat and top with the feta. Grate the zest of the lemon onto the feta and then squeeze over the juice. Sprinkle with the remaining herbs and serve, with harissa and crusty bread.
Recipe adapted from BBC Good Food.
Rebecca’s Recipe of the Week: A Falafel Salad
A Falafel Salad
The New York Times describes this as the salad equivalent of a falafel sandwich. It combines tahini, mint, cucumber, and crunchy pita with spicy, warm chickpeas. It’s really good. If you don’t want to mess around with cooking the kale, you could also use salad greens.
Spiced Chickpea Salad With Tahini and Pita Chips

Serves 4
Ingredients
For the chickpeas
2 tins of chickpeas, well drained, or the equivalent of your self-cooked chickpeas
about 180ml olive oil
2 garlic cloves, minced
2 teaspoons ground cumin, or 1 teaspoon each ground cumin and ground coriander
1 teaspoon sweet smoked paprika
Salt and pepper
For the tahini sauce
5 tablespoons (80ml) tahini
freshly squeezed juice of 1 lemon, plus more to taste
1 garlic clove, minced
water, as needed
To finish
Olive oil, for cooking
About 30g kale, chard or spinach, well washed and thick stems removed
180g pita chips (see Tip)
Handful of roughly chopped flat-leaf parsley
Handful of roughly chopped mint
1 cucumbers, thinly sliced
Lemon, cut into wedges
Preparation
Prepare the chickpeas: Preheat your oven to 220C. Pour the chickpeas into a small baking dish, about 15cm x 20cm. The chickpeas should be crowded together in a thick layer, not spread out. Pour in olive oil until chickpeas are just covered. Stir in the garlic, cumin, paprika, and 2 big pinches each of salt and pepper. Bake until oil is bubbling around the chickpeas and they are turning reddish-brown, 35 to 40 minutes. Set aside to cool.
Meanwhile, make tahini sauce: Pour the tahini into a bowl and whisk in lemon juice and garlic. The tahini will thicken and clump. Slowly whisk in the water, a little at a time, until the sauce becomes smooth, creamy and pourable. Taste and season with salt, pepper and more lemon juice, if desired. Set aside.
Cook the greens: Place a large frying pan over medium heat and drizzle lightly with olive oil. When hot, add the greens in batches, along with a big pinch of salt. Stir until wilted and tender and set aside.
Assemble the salad: in a large bowl, gently mix the chickpeas and their cooking oil with the cooked greens, half the pita chips, and the chopped herbs. Add the cucumber slices and drizzle with half the tahini sauce. Scatter the remaining pita chips on top. Arrange the lemon wedges around the side and serve, passing extra tahini sauce at the table.
Tip
It’s easy to make pita chips from stale pita bread. Cut each pita bread into triangles and separate the top and bottom layers. Heat 2 tablespoons olive oil in a large skillet over medium-high heat. When the oil shimmers, add the pita triangles and cook, stirring often, until golden brown. Reduce the heat as needed to prevent scorching.
Recipe adapted from New York Times Cooking (2019)
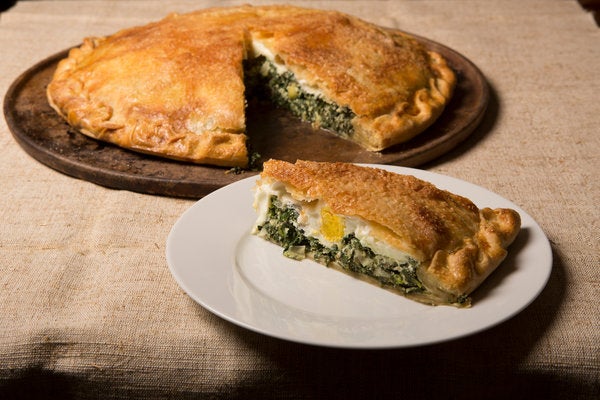
Rebecca’s Recipe of the Week: An Easter Pie
This Easter I am going to make a Torta Pasqualina, or Italian Easter Tart. It combines creamy ricotta with fresh greens baked in a flaky crust—so it’s a bit like a Greek spanakopita. To give it an Easter twist you crack some whole eggs onto the greens before baking. When the finished tart is sliced you get a lovely mass of green with little pockets of soft-cooked egg nestled under the crust. Very seasonal!
Ricotta, Spinach and Egg Easter Tart (Torta Pasqualina)
Serves 6-8
Ingredients
Pastry
160g cold butter, diced
250g plain flour
200g ricotta
pinch of salt
a little beaten egg or milk to brush over the top of the tart
Filling
600g kale, spinach, chard or other mixed greens
2 tablespoons olive oil
3 large onions, chopped
300g ricotta
6 eggs plus extra for brushing
Salt and black pepper
80g parmesan, grated
A pinch of nutmeg
Method
Make the pastry: Rub the butter into the flour with your fingertips until it resembles breadcrumbs. Add the ricotta and a pinch of salt, mix and bring together into a soft ball. Turn the pastry on to a floured work surface and knead until smooth. Cover with clingfilm and chill for 30 minutes.
Make the filling: Bring a pot of water to the boil. Meanwhile pick over the greens, discarding any tough stalks and discoloured leaves, then wash them. Working in batches, add some of them to a pan. Bring back to the boil and cook for a few minutes, just long enough to wilt the greens. Remove the cooked greens to a colander and repeat with the remaining greens. When they’re all cooked let them drain for at least 10 minutes. Once they are cool enough to handle, use your hands to squeeze out as much water as possible, and then chop roughly.
Heat the olive oil in a pan until warm and then add the chopped onion. Sauté for 5 minutes, and then add the greens. Stir and heat for a few minutes and then remove from the heat. Mix in the ricotta, 2 lightly beaten eggs, salt, pepper, parmesan and nutmeg.
Butter and flour a 26cm round tin, preheat your oven to 190C and put a flat baking tray in to get hot.
Cut the dough into two pieces, one twice the size of the other. On a floured surface roll the larger piece into a circle large enough to fill the tin, come up the sides and hang over the edge. Lift the dough into the tin and press it in. Add the filling. Using a spoon, make four deep indents in the mixture. Break the remaining four eggs into these indentations.
Roll the smaller piece of dough into a disc large enough to generously cover the top of the tin. Place it over the top of the tart and, using wet fingertips, press the dough to make a firm seal, and then fold any excess dough back towards the centre to make a little fringe. Prick or slash the centre of the tart. Paint the top with beaten egg or milk, put onto the hot baking tray, and bake for 50 minutes or until golden.
Allow to cool a little before turning out. Serve warm or at room temperature.
(Recipe adapted from Rachel Roddy, The Guardian and New York Time Cooking.)
Rebecca’s Recipe of the Week: Vaguely Turkish Greens
This is based very loosely on a classic Turkish dish called çilbir, which consists of soft poached eggs topped with garlicky yoghurt and a butter sauce spiced with Aleppo pepper. I’ve also had the same pair of toppings on pasta. Here the garlic yoghurt and spicy butter are combined with fresh greens and served on a base of lemony rice with chickpeas. Having two sauces gives this quick and easy dish a luxurious feel.
Vaguely Turkish Greens, Serves 2
Ingredients
about 200ml full-fat yoghurt
1 clove of garlic, mashed to a paste with ½ teaspoon salt
2 tablespoons butter
¼ teaspoon smoked paprika (I used the ‘sweet’ variety). If you have some Aleppo pepper (pul biber), use that instead.
450g spinach, chard, or other greens
about 1 cup of cooked brown rice
¾ of a tin of chickpeas (the tins that combine black and ordinary chickpeas look particularly nice)
1 tablespoon olive oil
zest and juice of half a lemon
salt and pepper
Method
In a small bowl, combine the yoghurt and crushed garlic. Taste it: it should be salty and garlicky. Add a bit more salt if you like and set aside.
Put the butter and the smoked paprika in a small pan or microwave-safe jug and warm gently until the butter is melted. Set aside.
Wash the greens and put them in a large pan. Steam or boil until they are tender—about 4 minutes.
Meanwhile, combine the cooked rice, chickpeas and olive oil and warm the whole thing in a microwave or on the stove. Once it’s warm add the lemon zest and juice, and season to taste.
Drain the greens, and use a wooden spoon to press out as much water as you can. I also use a pair of kitchen scissors to snip the cooked greens into smaller units as they sit in the colander, but you don’t need to do this.
Now assemble the dish: divide the chickpea rice into two bowls. Top each with half the cooked, drained greens. Dollop half the garlic yoghurt on top of each. It looks nice if you make several discrete dollops, rather than just pouring it over the top—that way you can see the greens underneath. Now drizzle the melted paprika butter over the yoghurt, making a red criss-cross across the white yoghurt and green greens. Top with a final grind of black pepper and enjoy. A glass of white wine is a pleasant accompaniment.
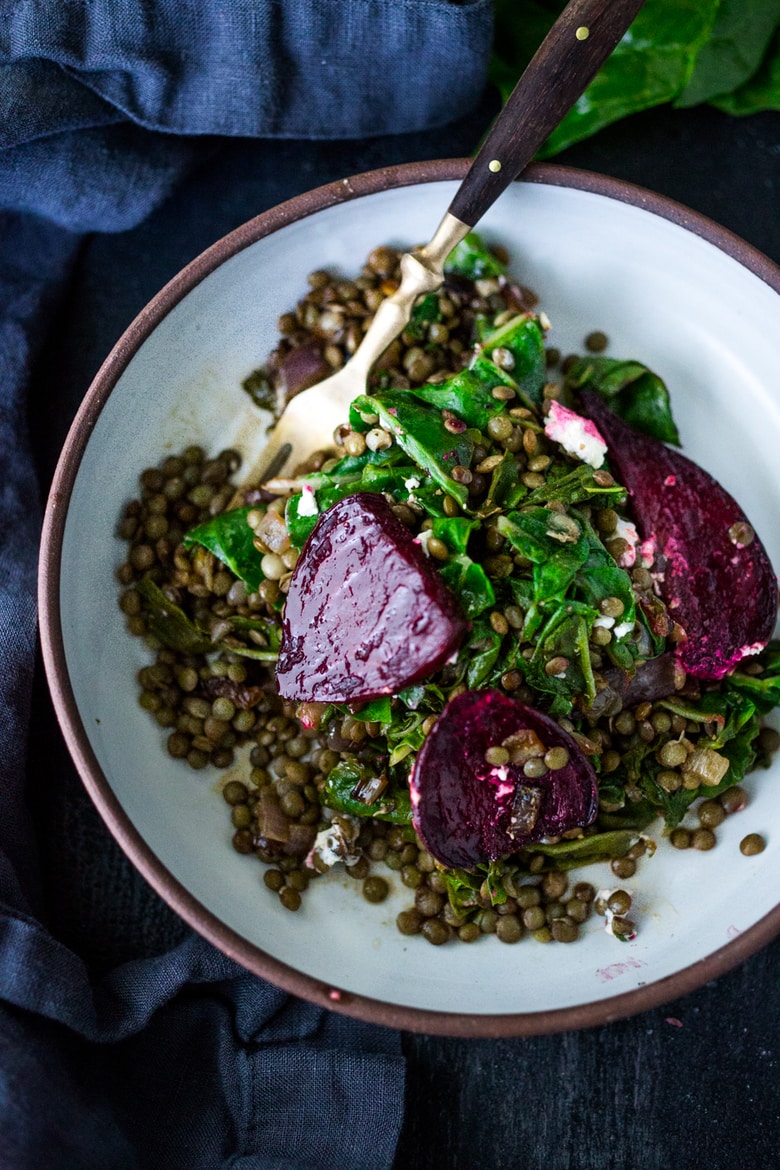
Rebecca’s Recipe of the Week: Beetroot, Lentils, Cheddar
Beetroot with feta, or goat cheese, is a classic combination, but other cheeses are available. Cheddar, for instance. Lentils add bite and substance to this salad, and the mustard brings a complementary zing that combines well with the cheddar. You can use either red or yellow beetroot in this salad, which makes a good lunch or simple supper.
Beet and Lentil Salad With Cheddar
Serves 4

Ingredients
For the salad:
500g beetroot
300g green lentils, rinsed
1 garlic clove, smashed
1 teaspoon salt
approx. 2 cups rocket or another green such as shredded Swiss chard
5g dill, parsley, mint or coriander, roughly chopped
50g Cheddar, roughly crumbled
handful walnuts or hazelnuts, toasted in a dry frying pan for a few minutes
For the apple cider vinaigrette:
1 small garlic clove, grated
2 tablespoons apple cider vinegar
3 tablespoons extra-virgin olive oil
1 tablespoon maple syrup or brown sugar
½ teaspoon Dijon mustard
¼ teaspoon salt
several grinds of freshly ground pepper
Preparation
Place the beetroot in a microwave-proof bowl. Add 1 cup water to the bowl and cover the bowl tightly with clingfilm. Microwave for 20 minutes. By now the clingfilm should have collapsed tightly onto the beetroot, creating a sort of vacuum-seal. With your finger prod the beetroot through the clingfilm to see how soft it is. If it feels tender, the beetroot is done. If not, put it in for another 5 minutes and test it again. Keep going until the beetroot feels tender. Once it’s done, remove it from the microwave, peel back the clingfilm, drain, and set aside.
Meanwhile, cook the lentils: in a medium pot, add the lentils, salt, garlic and 1 litre of water. Bring to a boil over high. Reduce heat to medium, cover and simmer for 20 to 25 minutes until just tender. (The lentils should still have some bite). Drain in a colander and stir to break up and evenly distribute the garlic. Let the lentils cool slightly.
Once the beetroot is cool enough to handle, set about peeling it. The peel should come off fairly easily with a knife. Cut the beetroot into 1cm cubes, or slice into small wedges.
While the lentils cook, prepare the vinaigrette: in a large serving bowl, whisk the garlic, vinegar, oil, maple syrup and mustard with the salt and pepper. Add the warm lentils to the serving bowl, then add the beets, greens, nuts and herbs. Toss together and then stir in the the cheese. Don’t stir too vigorously, because you don’t want the cheese to turn crimson from the beets, and serve.
Recipe adapted from Hetty McKinnon, New York Times Cooking
Rob’s Recipe of the Week: Beets and Chard from the Share
As always I continue to try to find new ways to enjoy roasted beetroot as it takes us through the winter and this week I think I’ve found a good one. Either a fun lunch or a dinner padded out with some nice bread, you choose!
Warm lentils with roasted beets, wilted chard & goat cheese
Ingredients
3–4 beetroot ( enough for 2 people)
2 cups cooked lentils
2 tablespoons olive oil
½ a red onion- diced
3 garlic cloves- rough chopped
4 cups (packed) swiss chard or rainbow chard- chopped (or sub beet greens, spinach)
salt and pepper to taste
1 tablespoon balsamic vinegar, more to taste
¼ cup goat cheese crumbles
2–3 tablespoons fresh basil, or parsley.
Instructions
Preheat oven to 220C. Scrub and trim beetrot and cut into ½ inch slices or wedges. Drizzle with olive oil and roast until tender, about 25- 30 minutes.
If cooking lentils, place ¾ cup dried lentils in a small pot and cover with 3 inches of water and a pinch salt. Bring to a boil, cover and turn heat down to a simmer, cook about 25-30 minutes or until tender but still hold their shape. Drain.
In a large frying pan, heat 2 tablespoons oil over medium high heat. Add diced onion and saute 3-4 minutes. Turn heat down to medium, add garlic and cook 2 more minutes, until golden and fragrant.
Lower heat to medium low. Add chard and gently wilt, just slightly, about 2-3 more minutes. Season with salt and pepper.
Add 2 cups cooked lentils to the frying pan, gently folding them in and warming. Season again with salt and pepper.
Add beetrot and splash with 1 tablespoon balsamic vinegar. Let vinegar cook down for just a couple of minutes so it’s not so acidic. Taste, add more vinegar if you like, cooking it down. Sprinkle with goat cheese and herbs. Taste again, if it tastes bland it most likely needs salt. Serve immediately.
From https://www.feastingathome.com/warm-lentils-wilted-chard-roasted-beets-and-goat-cheese/
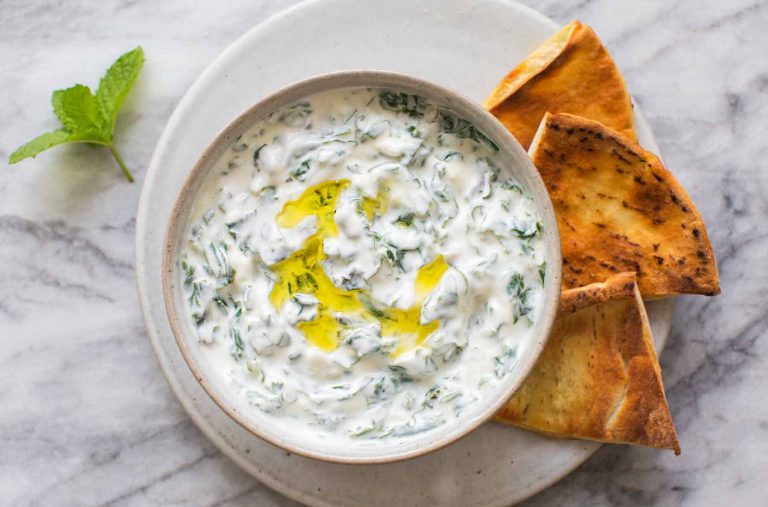
Rob’s Recipe of the Week: Chard Tzatziki
Chard is a common green throughout the winter, but with this recipe I hope to bring back a taste of the summer. I haven’t tried it yet but I’m expecting it to make a good tasty lunch!
Tzatziki yogurt dip
Ingredients:
3 to 4 large leaves of Swiss chard, ribs removed
1 cup plain Greek yogurt
1 1/2 Tbsp chopped fresh mint leaves
1 garlic clove, finely chopped
1/4 teaspoon salt
1 Tbsp extra virgin olive oil
1 teaspoon lemon zest
1 Tbsp lemon juice
Pita chips:
3 (9-inch diameter) pita breads, cut like a pie into triangles
Olive oil for drizzling on to the pita bread
Method
1 Blanch and chop the chard: Bring a 1 or 2 quart saucepan, half filled with water, to a boil. Add the chard leaves. Cook until tender, about 3 minutes.
While the chard is cooking, prepare a bowl with ice water for an ice bath. When the chard is cooked, remove it with a slotted spoon and put into the ice bath to stop the cooking.
When the chard has cooled, remove it from the ice water and bunch it into a ball. Wrap it in a paper towel and squeeze hard to remove excess moisture.
Chop up the chard.
2 Combine tzatziki ingredients: Put the Greek yogurt, chopped chard, chopped mint, garlic, salt, olive oil, lemon zest and lemon juice in a medium bowl. Stir to combine. Chill until ready to use (can make up to 3 days ahead).
3 Toast the pita bread: Cut the pita bread into triangles and layout in one layer in a grill pan (use a sturdy sheet pan or grill pan, not a thin baking sheet or your baking sheet will warp).
Drizzle olive oil on one side of the pita wedges. Use a pastry brush to spread the olive oil more evenly.
Place under the grill. Grill for 5 minutes or until the pita bread starts to toast. Remove and let cool for a minute.
4 Serve: Drizzle the tzatziki with a little olive oil and serve with toasted pita wedges.
Adapted from: https://www.simplyrecipes.com/recipes/swiss_chard_tzatziki_yogurt_dip/
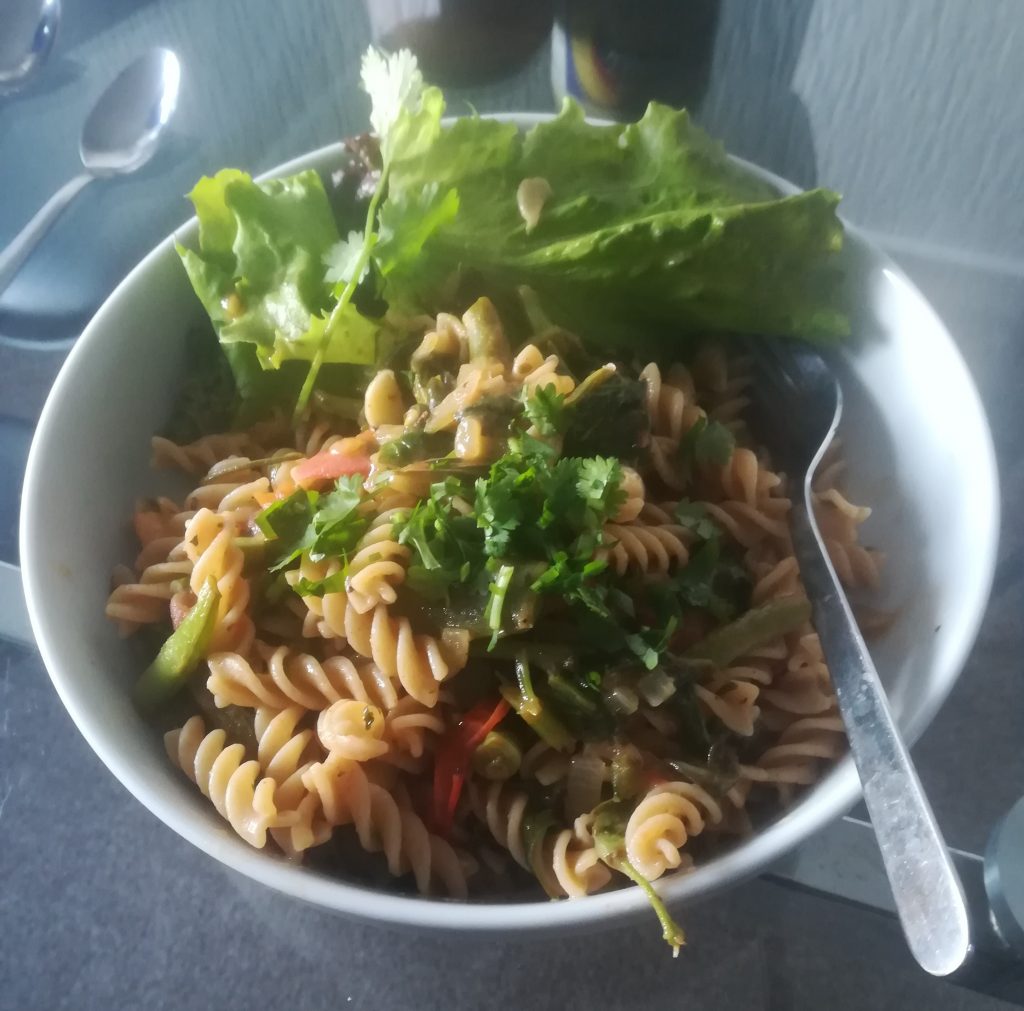
Rob’s Recipe of the Week: Road trip pasta
This week I’m keeping it simple and taking a little inspiration from a recent roadtrip to Italy. The spinach and tomato are pretty core to the dish but feel free to pick and choose from the rest of the list depending what you’ve got – I use an app called plant jammer to figure out what things might go well together.
Core Ingredients (for 1 person):
Pasta of your choice, 2 handfuls
Fresh Tomatoes, 1 large handful
Spinach (or other greens depending on share), 3 handfuls
Basil, small handful
Garlic, 1 clove
Lemon Juice 0.5-1 tablespoon or to taste
Olive Oil, 2-3 tablespoons or to taste
Mixed herbs, 1 teaspoon
Optional extras:
Black olives, small handful
Walnuts, small handful
Onion, 1 medium
Green/French Beans, about 3cm bundle
Method:
First chop all your veg; tomatoes into quarters, spinach may need stems chopping down to manageable size, garlic minced or thin slices, onion diced
Next get the pasta on the boil – when it’s ready remember to keep the water!
Whilst the pasta cooks, fry off onion and garlic, then add tomatoes, spinach and any optional extras and fry at a medium heat.
The pasta should be ready about the same time as the veg is cooked. Before draining, add the olive oil to the veg and then add a few sloshes of the pasta water – the starch helps make a good sauce! Then add the lemon juice, basil and mixed herbs and stir it all together until you have a nice shiny consistent sauce. Season with salt and pepper.
Drain the Pasta and add to the pan, mix and serve with some salad on the side and a little chopped coriander on top.
Rebecca’s Recipe of the Week: Buckwheat dosa with coconut chutney and greens
Rebecca’s Recipe of the Week: Buckwheat dosa with coconut chutney and greens
Another easy and delicious recipe from Meera Sodha. She writes: ‘This dish consists of three separate elements: the dosa batter, the coconut chutney and the vegetable filling. . . The key to success is to make [the dosas] in a nonstick pan on a very high heat – it needs to be very hot indeed – and make sure you leave them to crisp up properly before even thinking about flipping them with a spatula. The first pancake will inevitably fail – such is the universal law of pancakes – so make it a small one, so as not to waste too much batter’.
Buckwheat dosa with coconut chutney and greens
Serves 3
Ingredients
100g desiccated coconut
Salt
180g buckwheat flour
6 tbsp oil, plus extra for brushing
12 fresh curry leaves
1 tablespoon cumin seeds
1 tablespoon black mustard seeds
3 garlic cloves, peeled and minced
2cm ginger, peeled and grated
1-2 green chillies, finely chopped (or to taste)
400g chard or spinach, leaves shredded, tough stalks roughly chopped
200g frozen peas
Preparation
Put the desiccated coconut in a heatproof bowl with a third of a teaspoon of salt, cover with 275ml boiling water and leave to soak for at least 30 minutes.
Meanwhile, put the buckwheat flour in another bowl with half a teaspoon of salt. Slowly pour in 450ml water, mix to a thin batter, then set aside.
Put the oil in a nonstick frying pan and get it really hot, then add the curry leaves, cumin, mustard seeds, garlic, ginger and chillies, and fry for two to three minutes, until the garlic turns a pale gold. Carefully tip into a jug to cool. Keep the pan for later.
When the spiced oil has cooled, stir two tablespoons into the coconut mix, and another two tablespoons into the buckwheat batter. Tip the coconut into a blender and blitz until really smooth (add a little more water, if need be).
Reheat the frying pan over a high heat and, when hot, add the rest of the spiced oil, followed by the chard or spinach stalks. Fry, stirring, for three minutes, then add the leaves and cook until wilted. Throw in the peas, cook for a couple of minutes, until everything is nice and hot, then stir through a couple of tablespoons of the coconut chutney. Scrape out into a serving dish, wipe the pan clean with kitchen paper and put back on the heat.
Once the pan is really hot, brush the surface with a fine layer of oil. Add a small ladleful of batter and swirl it into a thin layer – a few gaps and bubbles are fine, because they can help the dosa get crisp. Cook the dosa for two minutes, until the edges are visibly crisp and browning, then gently lever up with a spatula, flip and cook for a further two minutes on the other side, before turning it out on to a plate. Repeat with the remaining batter, oiling the pan between each dosa.
Stuff the dosas with the greens and serve with the remaining chutney on the side.
Recipe adapted from Meera Sodha, The Guardian, 13 July 2019.