A Recipe from Rebecca: Nettle-Onion Pakoras with Wild Garlic Raita
Now is the time of year to forage for nettles and wild garlic. There are lots of things you can do with nettles, but a nettle-onion pakora is one of the best uses. Serve them with a bit of raita made from yoghurt, Canalside coriander and a chiffonade of wild garlic, and perhaps a beer. I hardly need to tell you to wear gloves whilst you collect your nettles, but it’s perhaps worth saying that the nettle tops are the best bits to use for this recipe. Once you blanch the nettles in hot water they will lose their sting, allowing you to enjoy their minerally, spinach-like taste. They combine perfectly with the nutty flavour of chickpea flour. If you can’t find any wild garlic, use double the amount of coriander instead.
Nettle-Onion Pakoras with Wild Garlic Raita
Serves 4 as a snack or 2 as a main
Ingredients
Raita
100g natural yoghurt
1 tablespoon fresh Canalside coriander, chopped
1 tablespoon wild garlic leaves, chopped (or use double the amount of coriander instead)
1 pinch sea salt
Pakoras
1 medium Canalside white onion, peeled
1 tablespoon lemon juice (or cider vinegar)
½ teaspoon salt
100g nettle tops
1 tablespoon fresh ginger
¼ Canalside dried chile (or more to taste), finely chopped
1 clove garlic, mashed to a paste with a little salt
1 teaspoon turmeric
1 teaspoon fennel seeds or cumin seeds
1 teaspoon ground coriander
½ teaspoon baking powder
100g chickpea (gram) flour
Up to 100ml tap water
Vegetable oil for frying
Method
For the Raita
Mix all the ingredients together and set aside while you prepare the pakoras.
For the Pakoras
Slice the onion into fine strips, place in a small bowl, and mix with the lemon juice (or vinegar) and salt. Set aside and leave for at least 15 minutes, to allow the flavour to mellow.
Pour some boiling water into a large pan and (wearing gloves) plunge in the nettles. Blanch in the hot water for 60 seconds and then drain thoroughly. They will no longer sting. Let them cool a bit, and then, using your hands, squeeze out as much water as you can.
Roughly chop them and place them in a large bowl. Add the ginger, garlic, spices and baking powder to the nettle bowl, along with the onion and any accumulated liquid. Mix everything well. Sift in the chickpea flour and slowly add water to make a sticky dough.
In a frying pan heat enough vegetable oil to coat the bottom of the pan over medium heat. Once it’s hot, drop in spoonfuls of the pakora batter, to make pakoras of your preferred size. We made 5 but you can make smaller ones if you like. Flatten the tops a bit with a fish slice and fry for about 2 minutes before turning over and frying the other side for another minute or so. As they cook remove them from the pan onto some paper towels to absorb any excess oil.
Serve with the raita, and perhaps a small glass of beer.
Recipe adapted from The Foraging Course Company
A Recipe from Rebecca: Roasted Carrot and Garlic Dip
‘This is delicious’, said a guest as we sampled Matt’s signature dirty martini a few weeks ago. ‘It is good, isn’t it?’, I replied. ‘No, I mean the dip’, he explained. It is good (and so were the martinis).
Roasted Carrot and Garlic Dip with Seed Dukkah
Serves 4-6 as a pre-dinner nibble.
Ingredients
For the Dip
500g carrots, unpeeled but cut into 2cm chunks
1 dried Canalside chile pepper
2 tablespoons olive oil + 1 more tablespoon olive oil (3 tablespoons total)
¾ teaspoon salt
1 whole head of garlic, left whole but with the top sliced off horizontally so you can see the actual garlic cloves
1½ tablespoons cashew or almond butter
1 lime, juiced (about 2 tablespoons)
For the Dukkah
1 tablespoon pumpkin seeds
1 tablespoon sunflower seeds
½ tablespoon cumin seeds
¼ teaspoon salt
¼ teaspoon sugar
½ teaspoon ufea chile flakes or any other mild chile flakes
Method
For the Dip: Heat the oven to the maximum setting (240C/220C fan). Line a baking tray with greaseproof paper.
Toss the carrots and chile pepper with 2 tablespoons olive oil and the salt. Spread on the baking tray.
Wrap the whole head of garlic in some foil and put that on the baking tray, too.
Put the baking tray in the oven and roast for 15 minutes. Remove the chile (set it aside), give the carrots and garlic a stir, and continue roasting them for another 15 minutes. Remove from the oven and set aside to cool a bit.
Once it is cool, unwrap the garlic and squeeze out the roasted garlic cloves into a small bowl.
Put the roasted garlic, carrots, chile, nut butter, and half the lime juice in a blender or food processer, and pulse until the mixture is coarsely blended. Season to taste with more salt or lime juice.
Transfer the dip to an attractive serving bowl and drizzle with the remaining tablespoon of olive oil and the remaining lime juice. Sprinkle with the dukkah (see below) and serve with something to dip into the dip. Sourdough crackers are good.
For the Dukkah: Heat a small, dry (i.e. no added oil) frying pan over medium heat. Add the seeds and stir, until everything seems a bit toasted. Let them cool a bit and then transfer them to a mortar along with the remaining ingredients. Bash them a bit until they are coarsely broken up.
Recipe adapted from Yotam Ottolenghi, Guardian, 26 June 2021
A Recipe from Rebecca: Spinach, Feta and Butter Beans
I recently listened to a fascinating episode of BBC Radio 4’s The Food Programme about ‘How Spain Does Beans’. The programme explained, among other things, why beans in a jar taste so good. Inspired by the programme I bought a jar of butter beans from Aubrey Allen. They cost more than beans from a tin, but they were really good. We’ve now eaten our way through several more jars, and I recommend them enormously for this or any recipe calling for butter beans. On the other hand, it’s also very, very good with ordinary tinned beans.
We ate this for diner with griddled asparagus and some roasted carrot and garlic mash.
Now, sorrel. If you can lay your hands on any of this fibrous, red-veined leaf, use it in place of some or all of the spinach. Since sorrel has its own sour, lemony flavour, you can reduce the lemon juice if you’re using sorrel.
Fried Butter beans with Feta, Sumac and Spinach or Sorrel

Serves 4.
Ingredients
60g butter
900g tinned or jarred butter beans, drained and rinsed
8 spring onions, halved lengthwise
1 garlic clove, peeled and mashed to a paste with ½ teaspoon salt
1-2 fresh red chiles, sliced thin (optional)
200g shredded spinach or, if you can get it, sorrel—or a mixture of both
3 tablespoons lemon juice (if you can get sorrel reduce this to about 1½ tablespoons)
150g feta, broken into pieces
2 teaspoons sumac
handful of chopped dill
olive oil, to drizzle over the top
Method
First fry the butter beans: heat a bit of the butter in a frying pan over medium-high heat. Add enough beans to cover the bottom of the pan in a single layer and fry for 1-2 minutes on each side, until the skin is golden brown and blistered. Remove to a large bowl and cook the remainder of the beans in the same fashion, adding more butter to the pan as necessary.
When the final batch of beans is almost done, add the spring onions, garlic, and chiles (if using), along with almost all of the spinach or sorrel. Keep back a little of the spinach or sorrel for a garnish.
Sauté everything together for another minute or two, and then return the other beans to the hot pan and mix everything together.
Remove from the heat and add the lemon juice. Scatter the feta over the top, sprinkle on the sumac, and top with the reserved spinach or sorrel, as well as the dill. Finish with a drizzle of olive oil and serve.
Recipe adapted from Yotam Ottolenghi, Plenty (2010).
Rebecca’s Recipe of the Week: Spicy Roasted Potatoes
This is really nice served with a green salad and some salted yoghurt on the side. Roasting the potatoes first before adding the spicy coating means you can get the potatoes nicely crisp without the spices burning.
Sami Tamimi’s Spicy Roasted Potatoes
Serves 4-6
Ingredients
1.5kg potatoes, unpeeled and cut into 3cm cubes
3 tablespoons olive oil plus 60ml more olive oil, separated
1 teaspoon salt
3-4 green chile peppers, halved, deseeded and thinly sliced crosswise
8 garlic cloves, peeled and thinly sliced
2 tablespoons cumin seeds, crushed lightly in a mortar and pestle
1 tablespoon ground coriander
1 lemon, zested and then cut into wedges
big handful (about 4 tablespoons) of fresh coriander, finely chopped
Method
Preheat oven to 250C.
In a large bowl toss potatoes with the 3 tablespoons of olive oil and the salt. Spread on baking sheets in a single layer. Put in oven and roast for about 20 minutes, or until a skewer inserted into a test potato meets just a little resistance.
Meanwhile, using the same bowl, mix together the remaining 60ml of olive oil, chile, garlic and spices.
When the potatoes are almost tender, as described, use a fish slice to transfer them to the bowl. Don’t turn off the oven! Gently toss the potatoes with the other ingredients, until well combined. Tip them back onto the baking sheets and spread them again into a single layer.
Return them to the oven and roast for another 10 to 15 minutes, or until the skewer meets no resistance. Cool for about 5 minutes.
Sprinkle the lemon zest and coriander over the potatoes and serve with lemon wedges.
Recipe adapted from Milk Street (2021).
Rebecca’s Recipe of the Week: A Very Good Beet Salad
I imagine you’re already aware of how good roasted beets are in a salad, especially if they are accompanied by some salty cheese. Here is a particularly tasty variant on this classic combination. Suzanne Goin, whose recipe this is, claims it converted her beetroot-hating mother into a beetroot fan. The cumin vinaigrette, fried chickpeas, flat-leaf parsley and sharp black olives combine with the rich, roasted beets and salty ricotta to make a treat for your mouth.
Ricotta salata is a hard, dried version of ricotta. You could use a hard goat or sheep cheese in its stead.
Roasted Beet Salad with Fried Chickpeas, Black Olives and Ricotta Salata
Suzanne Goin says this serves 6 as a starter. Matt and I ate the whole thing for dinner, with some bread.
Ingredients
1kg beetroot, cleaned
120ml olive oil
1½ teaspoons cumin seeds
¼ teaspoon salt
2 tablespoons red wine vinegar
1 tablespoon lemon juice
2 shallots, thinly sliced
250g cooked chickpeas
a fragment of chopped Canalside chile pepper, seeds removed if you like (optional)
90 grams dry, Niçoise-style black olives
15g flat-leaf parsley, coarsely chopped
100g ricotta salata, cut into thin slivers
more salt and pepper
Method
Preheat the oven to 200C.
Put the beetroots in a roasting pan, add a splash of water, and cover the pan tightly with foil. (I know it’s not great to use foil. You can at least try to reuse this foil, since it won’t get dirty.) Roast the beets for 40-90 minutes, or until tender when pierced with a knife. How long they take to roast will depend on their size. Let cool and remove the skins. They should rub off easily. If they don’t, you can use a knife. Slice the beetroots into wedges and place in a large bowl.
While the beetroots are roasting, toast the cumin seed in a dry medium pan over medium heat for 2 to 3 minutes, or until they smell cumin-y. Let cool a bit and then grind coarsely in a mortar and pestle. Transfer to a bowl.
To this bowl add the salt, red wine vinegar and lemon juice. Whisk in 100ml of olive oil. Taste and balance the seasoning, if necessary. Does it need a little more lemon juice, or salt? Add the shallots and set aside to marinate a bit.
Heat the remaining 20ml of olive oil in the pan you used for the cumin. When it is really hot, add the chickpeas and the chile (if you’re using it), and fry for 4-5 minutes, until the chickpeas are crispy. Shake the pan often. Once they’re crispy, season with a bit more salt and pepper and set aside.
Gently toss the beetroots with the cumin-shallot vinaigrette. Add the olives and parsley leaves and taste again. Balance the flavours with more lemon juice, salt or pepper, if necessary.
Array half the salad on a platter. Tuck half the cheese around the vegetables, and top with half the chickpeas. Place the rest of the salad on top, nestle in the remaining cheese, and finish with the remaining chickpeas. Enjoy.
Recipe adapted from Suzanne Goin, Sunday Suppers at Lucques (2005).
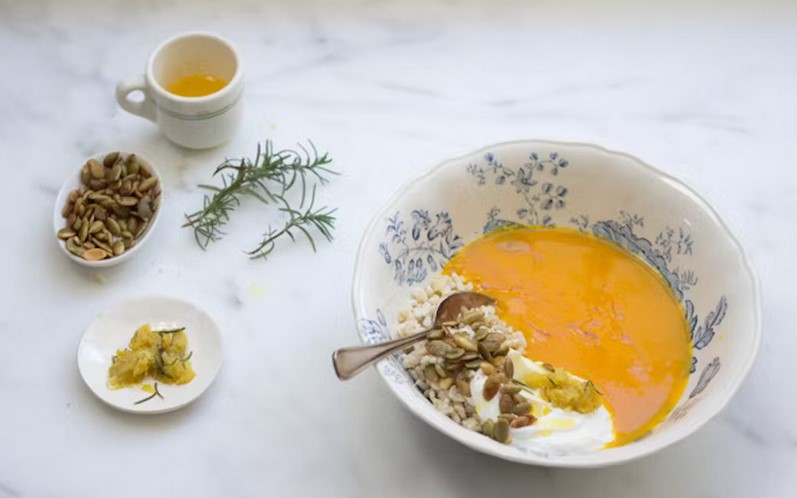
Rebecca’s Recipe of the Week: A Soothing Winter Soup
This makes a very good Friday night dinner. The pumpkin (or squash) soup is silky and rich, despite its simple ingredients, and the multiple toppings add complexity and, in the case of the pumpkin seeds, crunch. The rice provides a backdrop for the ginger-spiked soup and rosemary butter. You will leave the table feeling well-fed and comfortable in your tummy.
Pumpkin and Rice Soup, Serves 2-3 as a main
Ingredients
For the Soup
1 tablespoon butter
1 large onion, peeled and chopped
½ dried chile, chopped and de-seeded if you prefer
1 teaspoon salt
1kg squash or pumpkin
1.2 litres of water
2 teaspoons grated fresh ginger, or a bit more, to taste
To Serve
cooked brown rice, warm
plain yoghurt
toasted pumpkin seeds
lemon-ginger-rosemary butter (see below)
Method
In a large pot melt the butter over medium-high heat. Add the onion, chile and salt. Turn the heat to low and cook for 5-7 minutes or until the onion is softened.
Meanwhile, prepare the squash or pumpkin. Peel it, remove any seeds and cut it into 2cm chunks. You need about 700g once it’s been peeled and de-seeded.
When the onion is soft add the squash or pumpkin and water. Bring to a simmer and cook gently until the squash or pumpkin is soft. This will take between 15 and 25 minutes, depending on the squash or pumpkin.
Remove from the heat and add the ginger. Use a stick blender to puree until it is smooth. Add a bit more water if it seems too thick for your taste.
To serve, put a big scoop of rice in each soup bowl and top with the soup. Decorate with some yoghurt, toasted pumpkin seeds and lemon-ginger-rosemary butter.
Lemon-Ginger-Rosemary Butter
Ingredients
50g butter
rosemary leaves from a 10cm sprig, chopped
zest of 1 lemon
1 teaspoon grated fresh ginger
pinch of salt
Method
Melt the butter in a small pan over medium heat, until the butter starts to brown. Keep an eye on it so it does not burn.
Remove from the heat and stir in the other ingredients. Let sit for at least 5 minutes, to let the flavours meld.
Recipe adapted from 101 Cookbooks
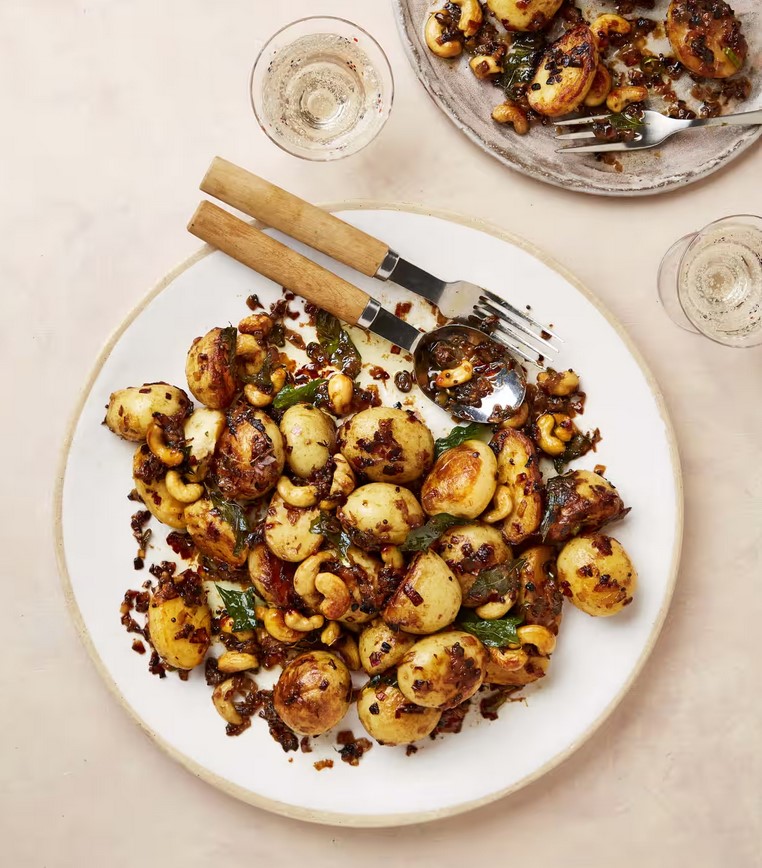
Rebecca’s Recipe of the Week: Meera Sodha’s Coconut-Tamarind Potatoes
This is a flavoursome dish that plays to the potato’s strength as a vehicle for strong flavours. Here your Canalside spuds combine with the richness of coconut milk and the sharp, sour tang of tamarind to deliver a punchy, satisfying dose of carbohydrates. Cashews and crispy onions contribute additional crunch. A sprinkling of green coriander over the top looks lovely and adds an additional freshness.
It is particularly good combined with the south Indian beetroot and coconut dip whose recipe I will provide in my next instalment.
Potatoes with Tamarind, Coconut and Cashews
Serves 4-6 as part of a larger spread.
Ingredients
1kg potatoes
3 tablespoons coconut oil
1 teaspoon black mustard seeds
1 teaspoon cumin seeds
10 fresh or frozen curry leaves
300g shallots, peeled and sliced fine—or you can use onion, really
3 garlic cloves, peeled and crushed
2cm piece of fresh ginger, peeled and grated
2 green chiles, finely chopped (take out the seeds if you prefer, and also adjust the quantity to taste)
100g cashew nuts
1 teaspoon salt
2 teaspoons tamarind paste
200ml coconut milk
a handful of coriander leaves, chopped, to garnish (optional)
Preparation
Put the potatoes in a pan and cover with cold water. Bring to a boil over low heat and cook gently until they are tender. How long this takes will depend on the size of the potatoes, so this process can last between 20 and 45 minutes. When the potatoes are tender drain them and set them aside. Once they are cook enough to handle cut them into bite-sized pieces. You can do this well in advance if you wish.
Combine the mustard seeds, cumin seeds and curry leaves in a little dish. Combine the garlic, ginger, chiles and cashews in another dish. You’re now all set to add each tranche of ingredients without having to fuss around with lots of separate items.
Put the oil in a large frying pan over medium heat. When it is hot add the mustard, cumin and curry leaves. Once the seeds start to sizzle add the shallots and cook, stirring, for about eight minutes, or until the shallots starts to brown.
Add the garlic, ginger, chiles and cashews to the pan. Cook, stirring regularly, for another two minutes. Now add the drained potatoes in a single layer and sprinkle with salt. Turn the heat to high and fry for about five minutes, stirring once, until the potatoes are turning an appetising brown. Don’t stir them constantly, or they won’t brown.
Finally, add the tamarind paste and the coconut milk. Leave to cook, stirring regularly, until the coconut milk has mostly evaporated and turned into a sticky glaze. Serve hot, cold or at room temperature. It looks nice garnished with some chopped fresh coriander.
Recipe adapted from Meera Sodha, The Guardian, 12 June 2021.
Rebecca’s Recipe of the Week: Sue’s Courgettes
My lovely sister in law Sue served this when we visited her this weekend, along with couscous and labneh (thickened yoghurt). It’s fresh, light and vibrant with the green chermoula, a flavoursome blend of fresh coriander, cumin, smoked paprika and lemon.
The recipe makes more chermoula than you’ll need for the recipe, but it’s very tasty and can be used on other vegetables; try it on boiled potatoes, or roasted carrots. It would probably also be delicious on a little escalope of grilled pork.
Courgettes, Sweetcorn and Green Chermoula
Serves 2-3 as a main
Ingredients
4 courgettes, topped and tailed
salt
3 tablespoons olive oil
2 ears of sweetcorn, outer leaves and ‘silk’ removed
squeeze of lemon juice
for the chermoula
10g garlic
15g red fresh chiles
1 preserved lemon
200g fresh coriander, roughly chopped
150ml rapeseed oil
10g ground cumin
4g smoked paprika
about 15ml lemon juice
salt to taste
Preparation
Slice the courgettes lengthwise and sprinkle with salt. Leave them 30 minutes in a colander to draw out the moisture. This will make the final dish more crunchy and fresh tasting.
While the courgettes are salting, make the chermoula: combine together the garlic, chile and preserved lemon in a blender or other blending device. Once it’s reduced to a paste add the coriander, oil and spices, and blend until smooth. Season to taste with the lemon juice and salt, and set aside.
When the courgettes have had their thirty minutes, brush off the salt and drizzle 1 tablespoon of the oil over the courgettes and sweetcorn.
Heat a griddle plan on high heat. When it’s hot grill the whole ears of corn, turning them regularly, until they are slightly charred on all sides. Remove and set aside.
Place as many courgettes as will fit without crowding in the pan, and cook for about 5 minutes, or until slightly charred on the bottom. Flip over, and cook for 2 minutes on the other side, or until cooked through but retaining some bite. Remove and set aside, and cook the other courgettes, if necessary.
Shave off the kernels off the now-slightly-cooled sweetcorn: hold each cob upright and use a sharp knife to slice down its length to remove the individual kernels. Place the kernels in a mixing bowl. Chop the courgettes into 2cm chunks and add them to the bowl. Toss with the remaining 2 tablespoons of olive and a squeeze of lemon juice.
To serve, place some of the sauce on the bottom of a serving plate and top with the courgettes and grilled corn.
Recipe adapted from the Observer Food Monthly, 25 July 2021.
Rob’s Recipe of the Week: A slow burner
This week I made green fermented hot sauce so I thought I would share the recipe. It’s a bit of a slow burner (excuse the pun) in that it won’t be ready to eat until next summer, but it’s a fun little project so bear with me…
Green fermented hot sauce
Ingredients (scale to suit your harvest):
450g green chillies
4 garlic cloves, peeled and crushed
3 tablespoons salt
4 cups warm water
Method:
To make chillies:
The first thing you need to do is reserve some seeds from the dried chillies in the share, and then sow them into modules or pots inside, early in 2022, repotting as they grow. I grew 9 plants in the end, which have happily produced all summer outside. I picked chillies green to stimulate more growth and froze them until I had enough for a batch of sauce. Approx 1 month of harvest gave me 225g of chillies which resulted in 1 jam jar of sauce. Beware it’ll be very hot – Frank’s hot sauce has nothing on the Canalside chillies!
To make sauce:
Remove tops of peppers and split in half lengthwise. You might want to wear gloves for this. Tightly pack a jar with peppers and garlic, leaving a little headspace
Mix salt and warm water to form a brine and pour this to completely cover the chillies
Fill a freezer bag (or alternative) with water and use this to weigh down the chillies, keeping them submerged
Cover with a kitchen towel and leave in a cool dark spot (such as a cupboard) for 3 or 4 days or until brine appears slightly cloudy and bubbly. The longer it sits, the funkier it will get. Don’t let it go past 7 days or it will be too funked (even for you). It’s worth opening the jar every day or so to release built up air pressure.
Strain the brine and reserve it. Transfer the chillies to a high-speed blender. Add 1 cup of the reserved brine, 1 cup of fresh coriander (omit if you don’t like the taste) and 1/4 cup apple cider vinegar to the blender, and process until very smooth. Strain the pulp through a fine-mesh sieve, and bottle.
Store in the refrigerator. The flavours will continue to develop and get more complex over time, and the heat will mellow. This will keep for at least 12 months in the fridge.
Adapted from: https://www.anarchyinajar.com/blog/2020/6/green-fermented-hot-sauce
Rebecca’s Recipe of the Week: Spicy Potato-Parsnip Soup with Preserved Lemon
Here is a good soup for a blustery spring day. The warming spices—cumin, coriander, paprika—give this a North African flavour, as does the preserved lemon. You can make this with any ratio of potatoes or parsnips that you prefer, including all potato or all parsnip. We enjoyed this with a glass of very robust Bulgarian merlot but other drinks are available, as they say.
Note that this involves only one pan, and so results in minimal washing-up.
Spicy Potato-Parsnip Soup with Preserved Lemon
Serves 2
Ingredients
For the Soup
2 tablespoons rapeseed or olive oil
1 onion, roughly chopped
2 garlic cloves, roughly chopped
½ dried Canalside chile, deseeded if you don’t want it too hot and chopped, or 1 medium-hot dried chile, treated similarly
1 teaspoon ground cumin
1 teaspoon ground coriander
½ teaspoon sweet smoked paprika (use a Spanish brand)
¼ cup preserved lemon, chopped fairly coarsely
500g peeled potatoes and parsnips, in any ratio (you can use all potatoes or all parsnips, too)
About 750ml stock (I think you could also use water, to be honest)
1 teaspoon salt
To decorate the Soup
4 tablespoons yoghurt
a little more smoked paprika
a little extra preserved lemon, coarsely chopped
Preparation
Heat the oil in a large saucepan over medium heat. Add the onion, garlic and chile, reduce the heat to low, and sauté gently for 10-15 minutes, or until the onion is soft but not brown. Stir in the cumin, coriander and paprika and cook for a minute or two more, until everything smells fragrant.
Meanwhile, cut the peeled vegetables into chunks of about 2cm.
When the spices in the pan are fragrant add the vegetables and the preserved lemon and pour in the stock (or water) and the salt. Bring to a simmer and cook for 30-40 minutes, or until the vegetables are very tender indeed.
Using a potato masher, mash the vegetables to give the soup a coarse texture. Hugh F-W suggests passing the whole thing through a sieve to create a smooth puree, but this seems both a lot of work and a dubious outcome as in my view a more rustic texture suits this soup far better. But it’s up to you. Add a bit of water if it still seems a bit thick to you, and check to see if it would benefit from a bit more salt.
To serve, dish your soup into bowls and garnish each with several spoonfuls of yoghurt, a sprinkling of paprika, and some golden cubes of preserved lemon.
Recipe adapted from Hugh Fearnley-Whittingstall, River Cottage Veg Every Day! (2011).