Veg in the Spotlight: Lettuce
With a significant amount of lettuce in the share as growth ramps up with the arrival of warm weather, it’s timely to share some inspiration for this summer share staple. The growers ‘cut and come again’ with our salad leaves as it allows us to keep cropping* the same plants until they bolt** ready to set seed*** later in the summer. We’re currently harvesting the first batch of outdoor lettuce. Later successions of sowings will mean we can keep harvesting lettuce right through until the end of the summer and into early autumn. This means that we can offer a mixed salad each week (currently including ‘Red’, ‘Paris de Blonde’, ‘Lollo Biondi’ and ‘Maravilla de Verano’) and we get the maximum produce from each plant for the least work.
*harvesting from
**send up a flower head
***make seeds for the next generation of plants
I remember really struggling to use all my salad in my first summer or two of Canalside produce, so until you’re ready to eat it by the handful straight from the bag (if that day ever comes for you!), hopefully some of these ideas will help you make the most of our summer leaves.
If you have a copy of the Boxing Clever Cookbook – the one cookbook I do go on about because it’s so useful for ideas and inspiration for using highly abundant seasonal veg – you’ll be able to find no less than 9 lettuce recipes! Eight of them can use loose leaves in the way we offer them, including 5 types of soup, lettuce and coconut chutney and lettuce risotto.
It also has a recipe for lettuce and walnut loaf – a sweet cake-like one with cinnamon and sugar. If you’re intrigued enough to try it, this seems to be the same recipe and here’s one using ginger and mace instead of cinnamon – a vintage 1968 recipe from the Kansas Wheat Commission.
Otherwise the following recipes can all be used with loose leaves, either whole or chopped:
Lettuce risotto with goat’s cheese from Delicious magazine – double tick as it would also use spring onions from this week’s share
Quick braised lettuce and peas from BBC Good Food
Garden salad, with a dressing recipe that also incorporates spring onion from this week’s share
If you eat animal protein, this dish might interest you:
Cod with bacon, lettuce and peas from BBC Good Food
There’s also an array of salad dressing recipes online of course – if you’d like to browse recipes for dressings that Rebecca has tried and shared, you’ll find them on the blog on our website here.
For recipes from Rebecca that would specifically use basil from the plants you collected recently, look here.
A Recipe from Rebecca: Grilled Mackerel with Green Olive, Celery and Raisin Salsa
This salty, sweet and crunchy salsa pairs perfectly with the rich, oily mackerel. The Ottolenghi team urge you to use ‘good quality’ olives and ‘plump’ raisins. This dish works well alongside another Ottolenghi dish: quinoa and red Camargue rice salad with orange and pistachios:
Grilled Mackerel with Green Olive, Celery and Raisin Salsa
Serves 4
Ingredients
For the Salsa
125g celery stalks, thinly sliced
60g green olives, pitted and thinly sliced
3 tablespoons capers, rinsed
70g raisins
1½ teaspoons sherry vinegar
60ml olive oil
3 tablespoons runny honey
15g parsley, roughly chopped
Salt and pepper, to taste (if necessary)
For the Fish
2 tablespoons olive oil
4 mackerel fillets
Salt and pepper
Method
For the Salsa: Stir together the salsa ingredients aside from the salt and pepper, and leave to sit for at least 15 minutes. Longer is fine. Taste the result: it should be sweet, sour and salty. Add salt or pepper if you think it necessary.
For the Fish: Heat a frying pan over medium-high heat and add the olive oil. When it is hot add the mackerel fillets, skin side down. Leave them alone for 2 minutes: resist the urge to move them about in the pan. By this point the flesh on the side facing up should begin to cook. Carefully flip the fish over and cook for another 1 to 2 minutes more, or until it is just cooked. Remove the pan from the heat.
To serve, place the fish on a serving platter and top with spoonfuls of salsa.
Recipe adapted from Yotam Ottolenghi and Sami Tamimi, Ottolenghi The Cookbook (2008).
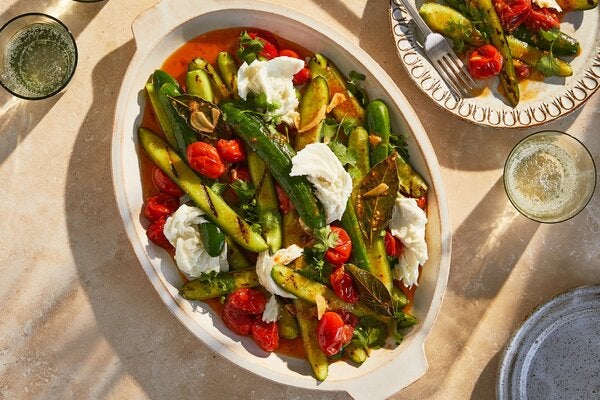
A Recipe from Rebecca: Grilled Cucumbers with Tomato-Cardamom Dressing and Mozzarella
Here is another thing to do with cucumbers when you tire of slicing them into salads. Yotam Ottolenghi remarks that ‘grilling cucumbers gives them a nice charred flavor while retaining their bite. . . Torn mozzarella adds richness to the cucumbers doused with a garlicky, spiced tomato dressing’. You could also grill the cucumbers on an outdoor grill, if you run to such things. I used a mixture of cucumbers and slim courgettes, which worked very well. Serve with some good bread to soak up the excellent tomato sauce.
Grilled Cucumbers with Tomato-Cardamom Dressing and Mozzarella
Serves 4 as part of a larger meal or 2 as a main
Ingredients
For the Tomato Dressing
500g tomatoes, chopped into large chunks
7 tablespoons olive oil
6 garlic cloves, peeled and thinly sliced
2 teaspoons white miso
4 fresh bay leaves
18 cardamom pods, roughly crushed in a mortar and pestle
½ teaspoon sweet smoked paprika
½ teaspoon salt
2 tablespoons lime juice
a few grinds of black pepper
For the Cucumbers
800g cucumbers (you could instead use slim courgettes, or a mixture of both)
1 tablespoon olive oil
½ teaspoon salt
a few grinds of black pepper
1 ball buffalo mozzarella (about 125g), roughly torn
about 8g coriander leaves and soft stems, roughly chopped
Method
Start with the dressing: put the tomatoes, oil, garlic, miso, bay leaves, crushed cardamom pods and seeds, paprika, and salt in a large (lidded) sauté pan. Place over medium-high heat, give everything a good stir and heat, uncovered, until it starts to bubble gently.
Once the dressing is bubbling, turn the heat down to medium-low, cover with the lid and cook gently for 15 minutes, stirring once, until the tomatoes have burst and start to release their juices. Turn down the heat if necessary; you want the garlic to soften without taking on colour, and you don’t want the tomatoes to disintegrate completely. Remove from the heat, stir in the lime juice, season to taste with pepper, and set aside.
Now prepare the cucumbers (or courgettes): halve the cucumbers (or courgettes) lengthwise and then halve each of these pieces lengthwise, to make four long cucumber wedges. You need these to fit into your griddle pan, so cut them in width-wise if necessary, to make shorter lengths. Put the vegetables into a bowl and toss with the oil, salt, and a good grind of pepper.
Heat a grill pan over high, and open a window. This might get a bit smoky.
When the grill pan is very hot, grill the cucumbers (or courgettes) in batches, cut sides down, for 2 to 3 minutes, then flip them over and grill for 1 to 2 minutes more. You want nice grill marks and for the cucumbers to soften but still retain a bite. Courgettes will take a little longer. As they become ready, transfer to the tomato pan, stirring to coat in the dressing.
Once all the veg have been grilled, stir the coriander into the pan and transfer the mixture to a large serving platter. Sprinkle on the torn mozzarella, along with a good pinch of salt, and serve hot or at room temperature.
Recipe adapted from Yotam Ottolenghi in New York Times Cooking
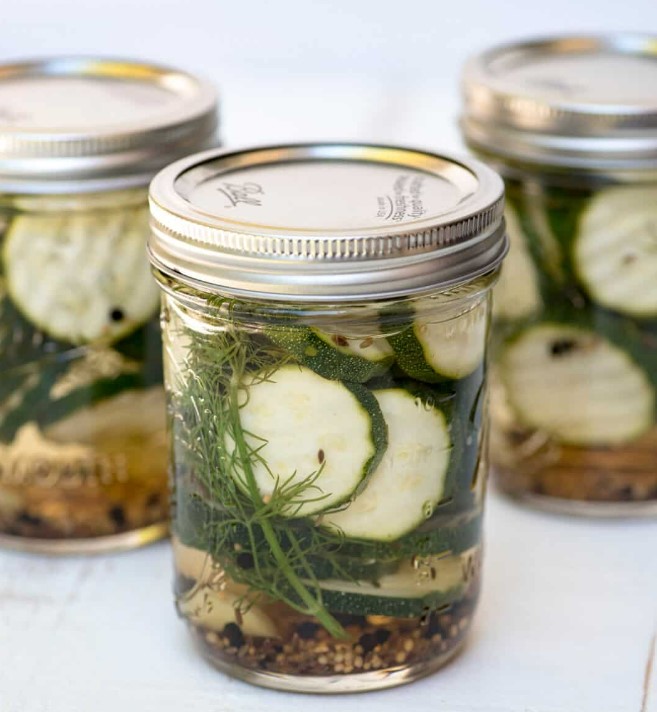
A Recipe from Rebecca: Refrigerator Pickles
My grandmother used to make refrigerator pickles, which (as the name implies) need to be stored in the fridge. Here is an easy recipe for converting an abundance of courgettes into crisp, dilly pickles to have alongside your sandwich or in a burger.
Refrigerator Courgette Pickles
Ingredients
For the Pickles
3 garlic cloves, peeled and halved
1½ teaspoons black peppercorns
1½ teaspoons mustard seed
6 sprigs of fresh dill
700g courgettes
For the Brine
500ml water
250ml white vinegar
4 tablespoons sugar (I used muscovado)
2 tablespoons coarse sea salt
Method
Sterilise the jars in which you intend to store the pickles by pouring boiling water over them; you’ll need about 4 normal-sized jam jars or the equivalent. (See note below, as well.)
Divide the garlic, peppercorns, mustard seed and dill between them.
Wash, top and tail the courgettes. Slice into circles or spears, as you prefer, and pack neatly into the jars. Leave a bit of space at the top of each jar, so the courgettes can be covered completely in the brine.
Heat the brine ingredients over medium-high heat in a saucepan and boil until the sugar and salt dissolve.
Carefully pour the brine into your jars, put on the lids, and let cool to room temperature. (See note below, as well.)
Give the jars a good shake to distribute the spices and then store in the fridge for at least 24 hours before eating. They should last for some weeks.
NOTE: If the courgettes float to the surface you might want to weigh them down with something, to ensure they remain submerged in the brine, e.g. a smaller jam jar, ramekin dish etc. Make sure you sterilize these, too, with boiling water.
Recipe adapted from Valerie Brunmeier, Valerie’s Kitchen (2017)
A Recipe from Rebecca: Cumin-Scented Greens with Eggs, Feta, Lemon and Herbs
Shakshuka usually consists of eggs poached in a spicy tomato sauce. This is a green version, where the eggs are poached on top of a savoury mixture of cumin-scented greens, and then topped with feta, lemon and herbs. Serve it with good bread and some harissa if you’d like to spice it up a bit. Red or green, shakshuka is apparently a popular North African and Middle Eastern breakfast dish. It is also very nice for dinner, and uses only one pan.
We made it with some amazing duck eggs, which are huge and extra unctuous, so if you happen to have some lying around this is a good opportunity to use them. Ordinary eggs will be delicious too, though.
Green Shakshuka

Serves 2
Ingredients
3 tablespoons olive oil
1 large onion, roughly chopped
½ teaspoon salt
2 teaspoons cumin seed
1 teaspoon coriander seed
2 large garlic cloves, sliced thin
650-ishg greens (spinach, chard, spring greens, or a mixture), chopped
25g coriander, dill, mint, parsley, or a mixture, chopped
a wineglass (about 200ml) of white wine, or use water
2-4 eggs
100g feta, crumbled
half a lemon
Harissa and crusty bread, to serve
Method
Over medium heat, warm the oil in a frying pan and add the onion and salt. Reduce the heat to low and cook 5-10 minutes, or until the onion has softened.
While the onion is cooking toast the cumin and coriander seeds in a dry frying pan until fragrant. Keep an eye on it so it doesn’t burn. Set aside to cool a little and then grind it in a mortar and pestle (or use pre-ground spices).
Increase the heat back to medium and add the ground spices and garlic to the pan with the onion and stir for another minute or two, until it smells good.
Add the greens and most of the herbs—but keep a big handful of the herbs aside to use for a garnish. Stir everything together and sauté until the greens begin to wilt a bit. Add the wine or water, and cook for another 8-10 minutes, or until the greens are tender.
Once the greens are tender, use a spoon to create two to four little nests in the mass of cooked greens—one for each egg you intend to use. Crack each egg on the side of the pan, one at a time, and slide it into its nest. Cover the pan and cook for 4-6 minutes, or until the whites have set and the yolks are to your liking.
Remove from the heat and top with the feta. Grate the zest of the lemon onto the feta and then squeeze over the juice. Sprinkle with the remaining herbs and serve, with harissa and crusty bread.
Recipe adapted from BBC Good Food.
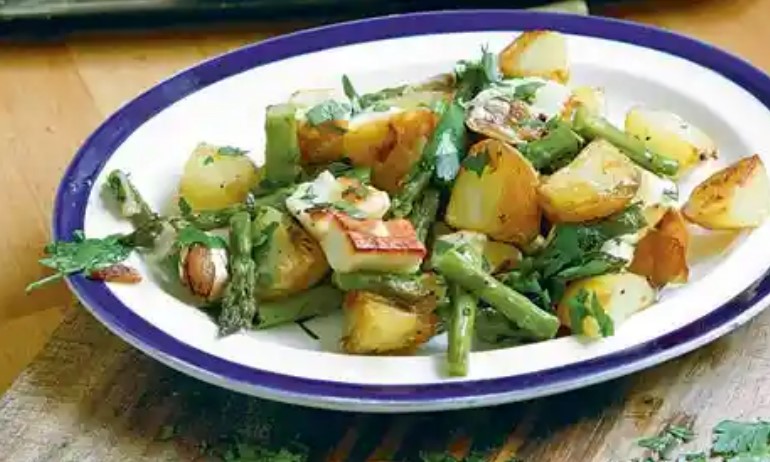
A Recipe from Rebecca: Roast Potatoes, Asparagus and Halloumi
Asparagus is such a treat; we should eat it all the time while it is in season. If you’re tired of having it steamed with melted butter and parsley (is that in fact possible?), or you would like to make a more substantial dish, try this. It’s delicious and feels luxurious. The halloumi turns crispy in the oven, with a rich, melty interior that contrasts well with the woody flavours of the asparagus. Hugh Fearnley-Whittingstall thinks this will serve four. I think two hungry people could finish this off. He recommends serving with some good bread; a glass of a nice dry Riesling doesn’t hurt either.
Roast Potatoes, Asparagus and Halloumi
Serves 2-3
Ingredients
600–700g potatoes, scrubbed or scraped
3–5 garlic cloves, unpeeled, bashed
3 tablespoons olive oil
400g asparagus
225g halloumi
½ lemon
salt and freshly ground black pepper
2 tablespoons roughly chopped flat-leaf parsley, to garnish
Method
Preheat the oven to 190C. Cut the potatoes into small chunks. Put them in a large roasting tray with the garlic, olive oil and some salt and pepper, and toss well.
Roast for 30 minutes.
Meanwhile, snap the woody ends from the asparagus and cut the spears into 3–4cm lengths. Cut the halloumi into 2cm cubes.
After the 30 minutes is up, take the potatoes from the oven, add the asparagus and halloumi, and toss to combine. You don’t want the tray to be too crowded – everything should be in a single layer. Return the tray to the oven for a further 15 minutes, or until the asparagus is tender and the cheese is starting to caramelise.
Add a generous squeeze of lemon juice and toss everything again, then transfer to a serving dish. Scatter with parsley, and another grind of black pepper. Bring to the table along with the remains of the lemon half, and some more olive oil, so that people can adjust the flavours to their liking. Serve with wedges of sourdough bread.
Recipe adapted from Hugh Fearnley-Whittingstall, The Guardian, 7 Sept. 2012.
A Recipe from Rebecca: Spinach, Feta and Butter Beans
I recently listened to a fascinating episode of BBC Radio 4’s The Food Programme about ‘How Spain Does Beans’. The programme explained, among other things, why beans in a jar taste so good. Inspired by the programme I bought a jar of butter beans from Aubrey Allen. They cost more than beans from a tin, but they were really good. We’ve now eaten our way through several more jars, and I recommend them enormously for this or any recipe calling for butter beans. On the other hand, it’s also very, very good with ordinary tinned beans.
We ate this for diner with griddled asparagus and some roasted carrot and garlic mash.
Now, sorrel. If you can lay your hands on any of this fibrous, red-veined leaf, use it in place of some or all of the spinach. Since sorrel has its own sour, lemony flavour, you can reduce the lemon juice if you’re using sorrel.
Fried Butter beans with Feta, Sumac and Spinach or Sorrel

Serves 4.
Ingredients
60g butter
900g tinned or jarred butter beans, drained and rinsed
8 spring onions, halved lengthwise
1 garlic clove, peeled and mashed to a paste with ½ teaspoon salt
1-2 fresh red chiles, sliced thin (optional)
200g shredded spinach or, if you can get it, sorrel—or a mixture of both
3 tablespoons lemon juice (if you can get sorrel reduce this to about 1½ tablespoons)
150g feta, broken into pieces
2 teaspoons sumac
handful of chopped dill
olive oil, to drizzle over the top
Method
First fry the butter beans: heat a bit of the butter in a frying pan over medium-high heat. Add enough beans to cover the bottom of the pan in a single layer and fry for 1-2 minutes on each side, until the skin is golden brown and blistered. Remove to a large bowl and cook the remainder of the beans in the same fashion, adding more butter to the pan as necessary.
When the final batch of beans is almost done, add the spring onions, garlic, and chiles (if using), along with almost all of the spinach or sorrel. Keep back a little of the spinach or sorrel for a garnish.
Sauté everything together for another minute or two, and then return the other beans to the hot pan and mix everything together.
Remove from the heat and add the lemon juice. Scatter the feta over the top, sprinkle on the sumac, and top with the reserved spinach or sorrel, as well as the dill. Finish with a drizzle of olive oil and serve.
Recipe adapted from Yotam Ottolenghi, Plenty (2010).
Rebecca’s Recipe of the Week: A Falafel Salad
A Falafel Salad
The New York Times describes this as the salad equivalent of a falafel sandwich. It combines tahini, mint, cucumber, and crunchy pita with spicy, warm chickpeas. It’s really good. If you don’t want to mess around with cooking the kale, you could also use salad greens.
Spiced Chickpea Salad With Tahini and Pita Chips

Serves 4
Ingredients
For the chickpeas
2 tins of chickpeas, well drained, or the equivalent of your self-cooked chickpeas
about 180ml olive oil
2 garlic cloves, minced
2 teaspoons ground cumin, or 1 teaspoon each ground cumin and ground coriander
1 teaspoon sweet smoked paprika
Salt and pepper
For the tahini sauce
5 tablespoons (80ml) tahini
freshly squeezed juice of 1 lemon, plus more to taste
1 garlic clove, minced
water, as needed
To finish
Olive oil, for cooking
About 30g kale, chard or spinach, well washed and thick stems removed
180g pita chips (see Tip)
Handful of roughly chopped flat-leaf parsley
Handful of roughly chopped mint
1 cucumbers, thinly sliced
Lemon, cut into wedges
Preparation
Prepare the chickpeas: Preheat your oven to 220C. Pour the chickpeas into a small baking dish, about 15cm x 20cm. The chickpeas should be crowded together in a thick layer, not spread out. Pour in olive oil until chickpeas are just covered. Stir in the garlic, cumin, paprika, and 2 big pinches each of salt and pepper. Bake until oil is bubbling around the chickpeas and they are turning reddish-brown, 35 to 40 minutes. Set aside to cool.
Meanwhile, make tahini sauce: Pour the tahini into a bowl and whisk in lemon juice and garlic. The tahini will thicken and clump. Slowly whisk in the water, a little at a time, until the sauce becomes smooth, creamy and pourable. Taste and season with salt, pepper and more lemon juice, if desired. Set aside.
Cook the greens: Place a large frying pan over medium heat and drizzle lightly with olive oil. When hot, add the greens in batches, along with a big pinch of salt. Stir until wilted and tender and set aside.
Assemble the salad: in a large bowl, gently mix the chickpeas and their cooking oil with the cooked greens, half the pita chips, and the chopped herbs. Add the cucumber slices and drizzle with half the tahini sauce. Scatter the remaining pita chips on top. Arrange the lemon wedges around the side and serve, passing extra tahini sauce at the table.
Tip
It’s easy to make pita chips from stale pita bread. Cut each pita bread into triangles and separate the top and bottom layers. Heat 2 tablespoons olive oil in a large skillet over medium-high heat. When the oil shimmers, add the pita triangles and cook, stirring often, until golden brown. Reduce the heat as needed to prevent scorching.
Recipe adapted from New York Times Cooking (2019)
Rebecca’s Recipe of the Week: Spicy Roasted Potatoes
This is really nice served with a green salad and some salted yoghurt on the side. Roasting the potatoes first before adding the spicy coating means you can get the potatoes nicely crisp without the spices burning.
Sami Tamimi’s Spicy Roasted Potatoes
Serves 4-6
Ingredients
1.5kg potatoes, unpeeled and cut into 3cm cubes
3 tablespoons olive oil plus 60ml more olive oil, separated
1 teaspoon salt
3-4 green chile peppers, halved, deseeded and thinly sliced crosswise
8 garlic cloves, peeled and thinly sliced
2 tablespoons cumin seeds, crushed lightly in a mortar and pestle
1 tablespoon ground coriander
1 lemon, zested and then cut into wedges
big handful (about 4 tablespoons) of fresh coriander, finely chopped
Method
Preheat oven to 250C.
In a large bowl toss potatoes with the 3 tablespoons of olive oil and the salt. Spread on baking sheets in a single layer. Put in oven and roast for about 20 minutes, or until a skewer inserted into a test potato meets just a little resistance.
Meanwhile, using the same bowl, mix together the remaining 60ml of olive oil, chile, garlic and spices.
When the potatoes are almost tender, as described, use a fish slice to transfer them to the bowl. Don’t turn off the oven! Gently toss the potatoes with the other ingredients, until well combined. Tip them back onto the baking sheets and spread them again into a single layer.
Return them to the oven and roast for another 10 to 15 minutes, or until the skewer meets no resistance. Cool for about 5 minutes.
Sprinkle the lemon zest and coriander over the potatoes and serve with lemon wedges.
Recipe adapted from Milk Street (2021).
Rebecca’s Recipe of the Week: A Very Good Beet Salad
I imagine you’re already aware of how good roasted beets are in a salad, especially if they are accompanied by some salty cheese. Here is a particularly tasty variant on this classic combination. Suzanne Goin, whose recipe this is, claims it converted her beetroot-hating mother into a beetroot fan. The cumin vinaigrette, fried chickpeas, flat-leaf parsley and sharp black olives combine with the rich, roasted beets and salty ricotta to make a treat for your mouth.
Ricotta salata is a hard, dried version of ricotta. You could use a hard goat or sheep cheese in its stead.
Roasted Beet Salad with Fried Chickpeas, Black Olives and Ricotta Salata
Suzanne Goin says this serves 6 as a starter. Matt and I ate the whole thing for dinner, with some bread.
Ingredients
1kg beetroot, cleaned
120ml olive oil
1½ teaspoons cumin seeds
¼ teaspoon salt
2 tablespoons red wine vinegar
1 tablespoon lemon juice
2 shallots, thinly sliced
250g cooked chickpeas
a fragment of chopped Canalside chile pepper, seeds removed if you like (optional)
90 grams dry, Niçoise-style black olives
15g flat-leaf parsley, coarsely chopped
100g ricotta salata, cut into thin slivers
more salt and pepper
Method
Preheat the oven to 200C.
Put the beetroots in a roasting pan, add a splash of water, and cover the pan tightly with foil. (I know it’s not great to use foil. You can at least try to reuse this foil, since it won’t get dirty.) Roast the beets for 40-90 minutes, or until tender when pierced with a knife. How long they take to roast will depend on their size. Let cool and remove the skins. They should rub off easily. If they don’t, you can use a knife. Slice the beetroots into wedges and place in a large bowl.
While the beetroots are roasting, toast the cumin seed in a dry medium pan over medium heat for 2 to 3 minutes, or until they smell cumin-y. Let cool a bit and then grind coarsely in a mortar and pestle. Transfer to a bowl.
To this bowl add the salt, red wine vinegar and lemon juice. Whisk in 100ml of olive oil. Taste and balance the seasoning, if necessary. Does it need a little more lemon juice, or salt? Add the shallots and set aside to marinate a bit.
Heat the remaining 20ml of olive oil in the pan you used for the cumin. When it is really hot, add the chickpeas and the chile (if you’re using it), and fry for 4-5 minutes, until the chickpeas are crispy. Shake the pan often. Once they’re crispy, season with a bit more salt and pepper and set aside.
Gently toss the beetroots with the cumin-shallot vinaigrette. Add the olives and parsley leaves and taste again. Balance the flavours with more lemon juice, salt or pepper, if necessary.
Array half the salad on a platter. Tuck half the cheese around the vegetables, and top with half the chickpeas. Place the rest of the salad on top, nestle in the remaining cheese, and finish with the remaining chickpeas. Enjoy.
Recipe adapted from Suzanne Goin, Sunday Suppers at Lucques (2005).