Rob’s Recipe of the Week: Beets and Chard from the Share
As always I continue to try to find new ways to enjoy roasted beetroot as it takes us through the winter and this week I think I’ve found a good one. Either a fun lunch or a dinner padded out with some nice bread, you choose!
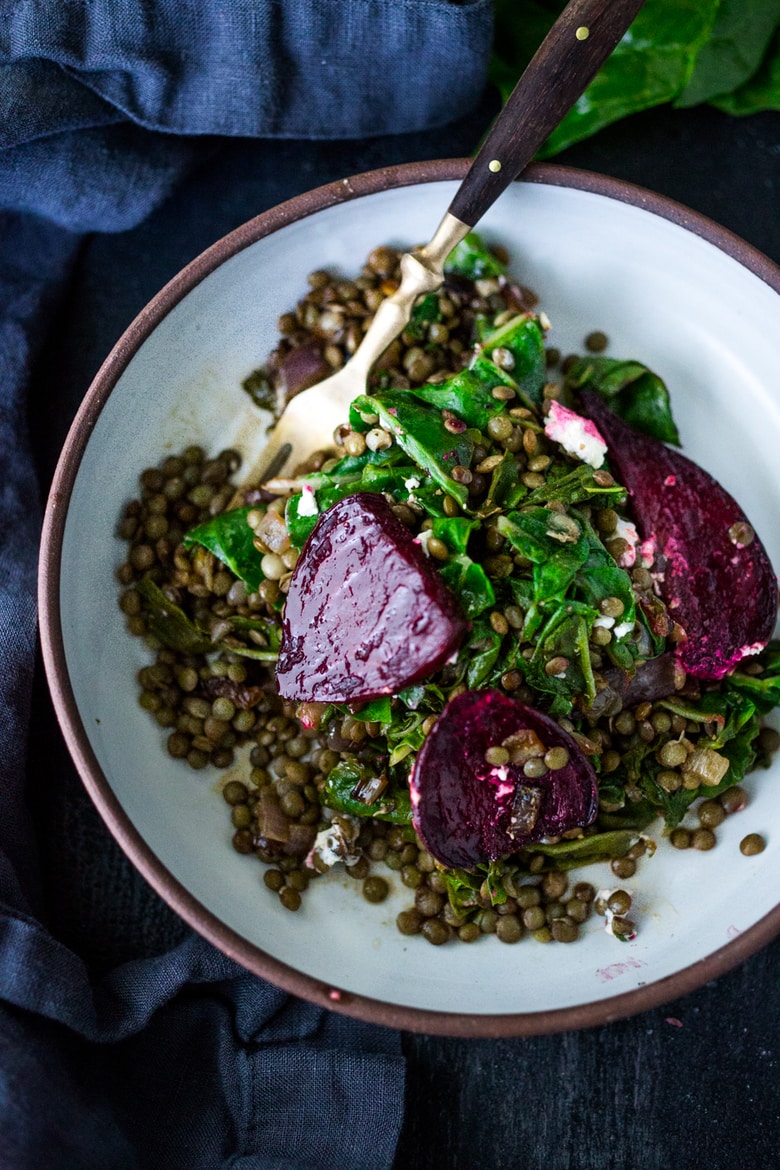
Warm lentils with roasted beets, wilted chard & goat cheese
Ingredients
3–4 beetroot ( enough for 2 people)
2 cups cooked lentils
2 tablespoons olive oil
½ a red onion- diced
3 garlic cloves- rough chopped
4 cups (packed) swiss chard or rainbow chard- chopped (or sub beet greens, spinach)
salt and pepper to taste
1 tablespoon balsamic vinegar, more to taste
¼ cup goat cheese crumbles
2–3 tablespoons fresh basil, or parsley.
Instructions
Preheat oven to 220C. Scrub and trim beetrot and cut into ½ inch slices or wedges. Drizzle with olive oil and roast until tender, about 25- 30 minutes.
If cooking lentils, place ¾ cup dried lentils in a small pot and cover with 3 inches of water and a pinch salt. Bring to a boil, cover and turn heat down to a simmer, cook about 25-30 minutes or until tender but still hold their shape. Drain.
In a large frying pan, heat 2 tablespoons oil over medium high heat. Add diced onion and saute 3-4 minutes. Turn heat down to medium, add garlic and cook 2 more minutes, until golden and fragrant.
Lower heat to medium low. Add chard and gently wilt, just slightly, about 2-3 more minutes. Season with salt and pepper.
Add 2 cups cooked lentils to the frying pan, gently folding them in and warming. Season again with salt and pepper.
Add beetrot and splash with 1 tablespoon balsamic vinegar. Let vinegar cook down for just a couple of minutes so it’s not so acidic. Taste, add more vinegar if you like, cooking it down. Sprinkle with goat cheese and herbs. Taste again, if it tastes bland it most likely needs salt. Serve immediately.
From https://www.feastingathome.com/warm-lentils-wilted-chard-roasted-beets-and-goat-cheese/
Rebecca’s Recipe of the Week: Hasselback Celeriac with Miso and Red Onion
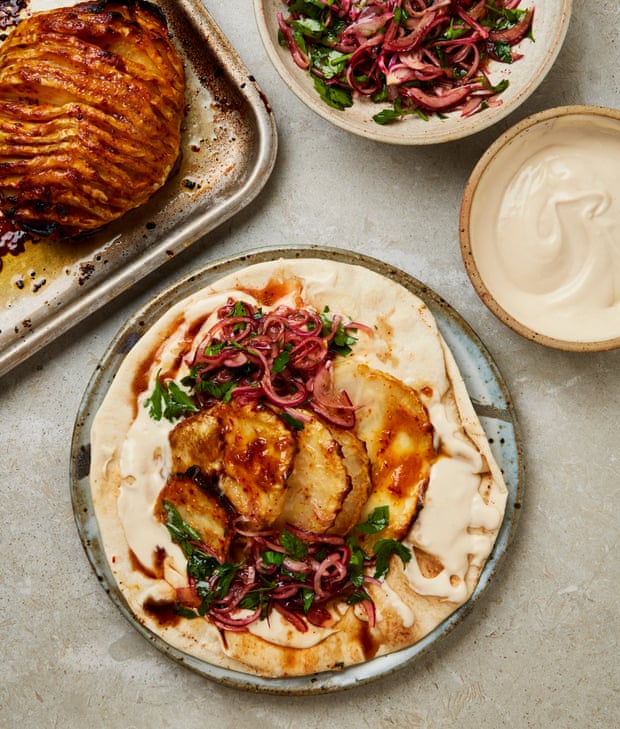
Meera Sodha says she created this recipe largely because she liked the sound of ‘hasselback celeriac’. Name aside, this is very good. Serve the rich, miso-roasted celeriac and Turkish salad inside a flatbread, topped with a drizzle of tahini sauce and you will have yourself a sticky, messy treat. The recipe has several different components but is actually very straightforward.
Incidentally, Hasselback is the name of a restaurant in Stockholm. The better-known Hasselback potatoes were supposedly invented there in the 1950s.
Hasselback Celeriac with Miso and Red Onion
Serves 3
Ingredients
For the celeriac
1 large or 2 small celeriacs (about 1-1.2kg total)
2 tablespoons olive oil
pinch of salt
For the miso glaze
60g white miso
½ tablespoon Turkish pepper
2½ tablespoons honey or brown rice syrup
1½ tablespoons lemon juice
For the tahini sauce
100g tahini
5 tablespoons water
1 tablespoon lemon juice
½ teaspoon salt
For the salad
1 large red onion, peeled, halved and sliced into thin half-moons
1 tablespoon pomegranate molasses
1 tablespoon lemon juice
1 teaspoon sumac
3 tablespoons olive oil
¼ teaspoon salt
1 large handful parsley, coarsely chopped
To Serve
6 flatbreads (look here for an excellent recipe)
Preparation
Heat the oven to 200C (180C fan).
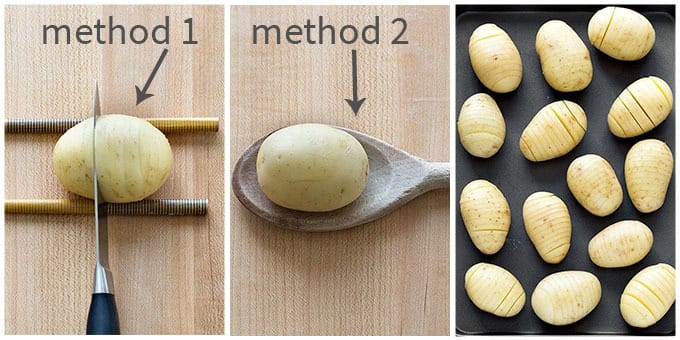
Chop off the base of the celeriac, and peel off the skin using a peeler or a sharp knife. If it is large, cut it in half and lay it flat on its cut side. Using your sharp knife, cut slices at 5mm intervals that go nearly but not all the way through, so that the slices are still joined at the base, like the pages join the spine of a book. The illustration shows one way to ensure that you don’t accidentally cut all the way through: place a wooden spoon handle or chopstick on either side of the celeriac, so that when you cut, they prevent the knife from slicing all the way to the work-top.
Now place the celeriacs on a baking sheet and drizzle with 2 tablespoons of oil and a pinch of salt. Place in the oven and roast for 70-90 minutes. Check partway through and drizzle with a little more oil if necessary. When they golden brown, they are ready for the glaze.
While the celeriacs roast, prepare the other components of the meal.
For the miso glaze: mix all the ingredients together in a small bowl.
For the tahini sauce: whisk all the ingredients together and put in a serving bowl.
For the salad: combine all the ingredients except the parsley in a serving bow. Mix together using your hands, and scrunch up the onions a little to soften them. Then add the parsley and set aside so the flavours can blend while the celeriac roasts.
Once the celeriac is golden and tender, brush with the miso glaze. Try to get some of the glaze between the slits. Bake for another 8-15 minutes, or until the celeriac is sticky and golden brown.
To serve, take the celeriac, salad, tahini sauce and bread to the table. Assemble your own combination of flatbread layered with celeriac and pomegranate-onion salad, topped with a generous serving of tahini sauce.
Recipe adapted from Meera Sodha, The Guardian, 13 Feb. 2021
Rebecca’s Recipe of the Week: Roast Parsnips, Lentils, Cheese
Here we have a warm, sustaining main-course salad made bright with greens and the bite of mustard. It’s a good use of that parsnip that’s still in your fridge. You can make a meal of this, along with some good bread and a glass of red wine.
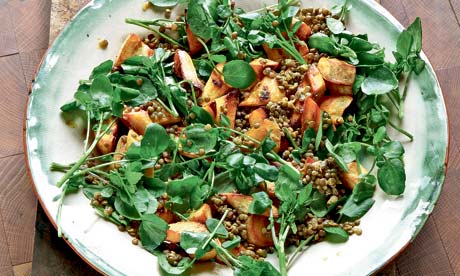
Roast Parsnip, Watercress and Lentil Salad
Serves 3
Ingredients
Salad
5 medium parsnips
2 tablespoons oil
salt and pepper
125g Puy or green lentils
2 bay leaves
1 medium onion, unpeeled
several parsley stems (optional)
several big handfuls of watercress or rocket
any hard cheese, to shave over the top
Salad dressing
1 clove garlic
½ teaspoon salt
1 teaspoon English mustard
2 teaspoons runny honey
1 tablespoon lemon juice
4 tablespoons rapeseed oil
Preparation
Preheat your oven to 190C.
Peel the parsnips and cut them into chunky batons. Toss them with the oil and a sprinkling of salt and pepper. Tip them onto a baking tray and roast for 30-40 minutes, or until they are tender and a bit golden. The time will depend on how large they are. You can poke them with a fork to see if they are soft inside. Remove from the oven and leave them to one side.
Meanwhile, prepare the lentils: cover them with boiling water and bring back to a boil. Boil for one minute, and then drain.
Return the drained lentils to the pan and add just enough water to cover them. Add the bay leaves, onion and parsley stalks (if you have any to hand). Bring to the boil, reduce to a simmer, and simmer for about 30 minutes, or until al dente. Drain and remove the bay leaves and parsley. It’s up to you either to remove the onion or to leave it in the finished salad.
While the lentils cook and the parsnips roast prepare the salad dressing. Mash the garlic with the salt in a mortar and pestle to make a smooth paste. Whisk in the other ingredients.
When the parsnips and lentils are finished, toss them, still warm, with the dressing and add the watercress or rocket. Pile onto a serving platter and shave some hard cheese over the top before serving.
Recipe adapted from Hugh Fearnley-Whittingstall, River Cottage Veg Every Day! (2011) – online at rivercottage.net
Rebecca’s Recipe of the Week: A Restorative Soup
This is what you need if you have eaten a lot of rich food over the holidays. The lentil soup is soothing, but not at all boring, enlivened as it is with marinated artichoke hearts and a swirl of yoghurt. You will feel better after eating this, I promise. Note, too, that it uses some of those leeks, carrots and celery that have accumulated in your fridge from the double share.
Lentil Soup with Artichoke
Serves 4
Ingredients
2 tablespoons olive oil
2 leeks, trimmed, halved lengthwise and sliced thin
3 medium carrots, peeled, halved lengthwise and sliced thin
4 celery sticks, sliced thin
1 heaped tablespoon grated fresh ginger
1 Canalside chile, left whole
4 cloves of garlic, peeled and chopped fine
250g green lentils
2 tablespoons cider vinegar
1.5l stock or water
1 teaspoon salt
5 heaped tablespoons coarsely chopped parsley
120g artichoke hearts from a jar, drained and sliced thin, to serve
plain or Greek yoghurt, to serve (if desired)
Preparation
Heat the oil over medium heat in a large saucepan with a lid. When it is warm add the leeks, carrots, celery, ginger and chile. Fry for about 10 minutes, or until the vegetables have softened and are starting to colour.
Add the garlic and stir for a few minutes more.
Stir in the lentils, and add the vinegar and water. Bring to a boil and simmer until the lentils are tender—20-30 minutes, probably. Add some more water if they seem dry.
Purée about a third of the soup in a liquidiser or food processor, and then stir this back into the pan. Add the salt and stir in most of the parsley, keeping back a little for a garnish.
Dish into bowls and place a sliced artichoke heart in the centre of each bowl. Sprinkle the remaining parsley over the top. Serve with a spoonful of yoghurt on top, if desired.
Recipe adapted from Annie Bell, Plant Power: Protein-rich Recipes for Vegetarians and Vegans (2020).
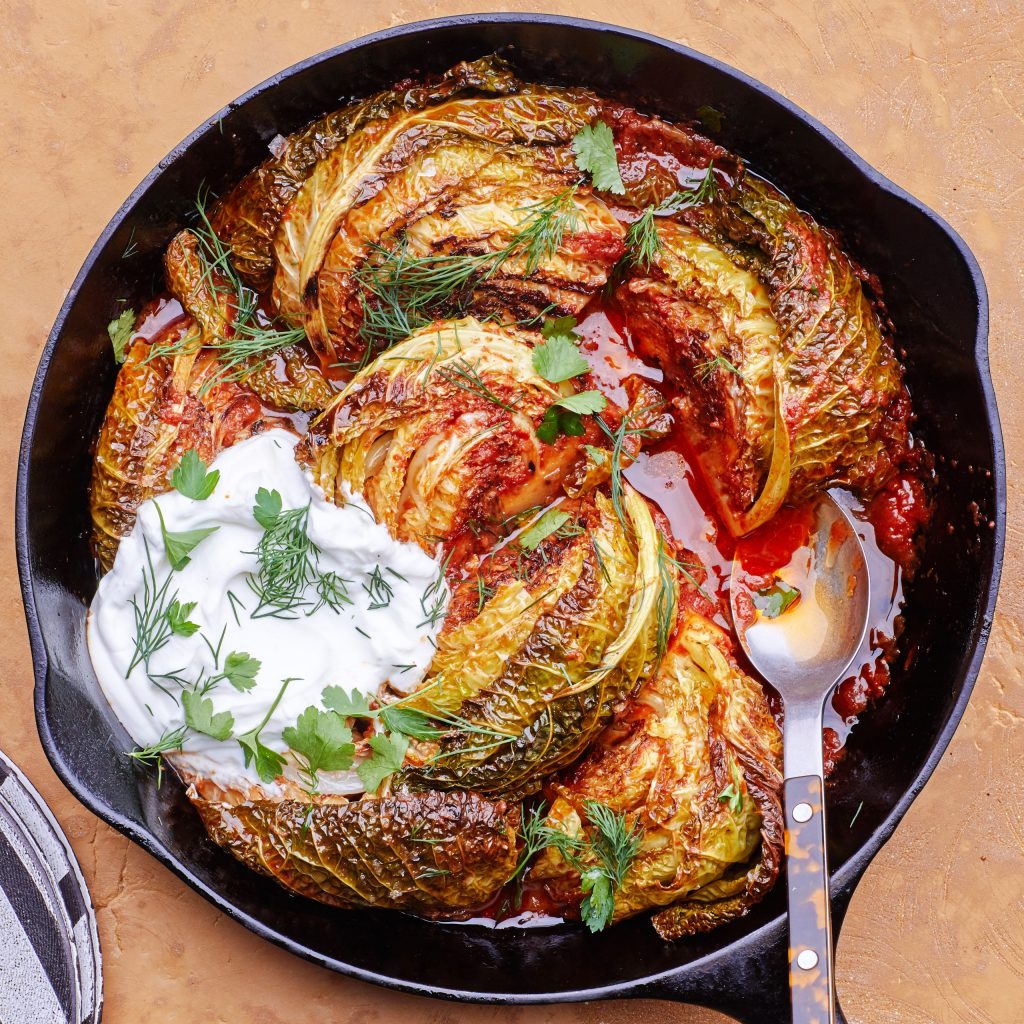
Rob’s Recipe of the Week: Caramelised Cabbage
This recipe isn’t so Christmassy, but I did enjoy it. I found the liquid took a lot longer than stated to reduce, but in the end I would actually have preferred a bit more sauce when serving. Goes well with mash!
Ingredients
¼ cup double-concentrated tomato paste
3 garlic cloves, finely grated
1½ tsp. ground coriander
1½ tsp. ground cumin
1 tsp. crushed red pepper flakes
1 medium head of green cabbage
½ cup extra-virgin olive oil, divided
Salt
3 Tbsp. chopped dill, parsley, or coriander
Full-fat Greek yogurt or sour cream (for serving)
Method:
Preheat oven to 180°. Mix tomato paste, garlic, coriander, cumin, and red pepper flakes in a small bowl.
Cut cabbage in half through the core. Cut each half through the core into 4 wedges.
Heat ¼ cup oil in a large oven safe frying pan (or similar) over medium-high. Working in batches if needed, add cabbage to the pan cut side down and season with salt. Cook, turning occasionally, until lightly charred, about 4 minutes per side. Transfer cabbage to a plate.
Pour remaining ¼ cup oil into pan. Add spiced tomato paste and cook over medium heat, stirring frequently, until tomato paste begins to split and slightly darken, 2–3 minutes. Pour in enough water to come halfway up sides of pan (about 1½ cups), season with salt, and bring to a simmer. Nestle cabbage wedges back into skillet (they should have shrunk while browning; a bit of overlap is okay).
Transfer cabbage to oven and bake, uncovered and turning wedges halfway through, until very tender, liquid is mostly evaporated, and cabbage is caramelized around the edges, 40–50 minutes.
Scatter dill/other over cabbage. Serve with yogurt alongside.
From BonAppetit.com
Rebecca’s Recipe of the Week: Pasta with Creamy Carrot Miso Sauce
Another very good recipe from Slyvia Fontaine. The creamy carrot sauce colours the pasta a beautiful gold, while the fresh, herby gremolata adds vibrant green. Toasted breadcrumbs provide a contrasting crunch against the richness of the sauce. You would certainly not guess that this is vegan, but you’ll see right away how beautiful it looks in your bowl. The flavours work really well together and I recommend this highly.
Pasta with Creamy Carrot Miso Sauce
Serves 4

Ingredients
Carrot Miso Sauce
2 shallots, rough chopped (or 1/2 an onion)
3 large garlic cloves, rough chopped
2 tablespoons olive oil
150g carrots
450ml water
40g cashews
Freshly-ground pepper
3 tablespoons white miso paste
Gremolata
60g fresh coriander or parsley (Sylvia notes you can also use carrot tops)
1 tablespoon lemon zest ( zest from one medium lemon)
¼ teaspoon salt
1 fat garlic clove
70-100ml olive oil
Toasted Breadcrumbs
1 thick slice of good bread, grated, to make about 50g breadcrumbs
250g pasta (Sylvia Fontaine recommends orecchiette)
Instructions
Cook the sauce: Heat oil in a medium pot, over medium heat. Saute shallot and garlic until fragrant and golden, about 5 minutes, stirring often. Add carrots, cashews, water, and pepper and bring to a boil. Cover, lower heat to low and simmer gently until carrots are fork-tender, about 15 minutes. Stir in the 3 tablespoons of miso and let cool for 5-10 minutes.
While the carrots simmer make the Gremolata: Place coriander or parsley, lemon zest, salt and garlic in a food processer and pulse repeatedly until finely chopped. Add 70ml oil, pulsing a few more times until incorporated (but not too smooth). Add more oil if you prefer a looser version.
Now make the breadcrumbs: place the breadcrumbs in a frying pan over medium heat and toast, stirring frequently, until the crumbs are golden brown. Set aside.
Bring some water to the boil, and cook the pasta according to the packet instructions.
While the pasta is cooking blend the sauce: place the carrot-cashew sauce in a high-speed blender or food processor and blend on the lowest setting, gradually increasing speed, until fully blended, creamy and silky smooth, which will take between one and two minutes. Slyvia writes: ‘Take your time here and get it SMOOTH!!!’
Drain the pasta and pour the sauce over. Heat it gently if needed. Taste and adjust salt.
Divide among bowls, and sprinkle with toasted bread crumbs and spoon the gremolata over top. Enjoy with a glass of chardonnay.
Recipe adapted from Sylvia Fontaine, Feasting at Home
Rebecca’s Recipe of the Week: Peas (and Salmon)
Peas cooked with onions and butter make an excellent dish to eat on their own. Add some pan-seared salmon fillets and you have an easy and very delicious meal.
(To pan-sear, dry the salmon carefully and then season liberally with salt. Heat a little neutral oil in a skillet, and when it is hot add the salmon, skin-side down. Press it into the pan with a fish so that it makes good contact with the heat. Cook, without moving the fish, for about 3 minutes, and then flip it over to cook the other side. Cook for an additional 1-4 minutes, depending on how cooked you like your fish.)
Peas with Parsley, Thyme, Butter and Onions
Serves 4 as part of a larger meal.
Ingredients
2 tablespoons neutral oil (rapeseed, sunflower seed etc.)
1 giant Canalside spring onion, thinly sliced (use the whole thing including the dark green leaves)
½ teaspoon salt
1/2 cup white wine
1 cup chicken stock
4 cups frozen (or fresh) peas
4 tablespoons butter
¾ cup fresh parsley, roughly chopped
5 springs of fresh thyme, roughly chopped
Preparation
Heat the oil in a large frying pan over medium heat. Add the sliced onion and the salt. Reduce the heat to low and cook until the onion is translucent and soft, but not brown. Add the wine and allow to reduce until almost completely dry.
Add the stock and bring to a boil. Add the peas and butter and cook until the stock has reduced, and the sauce is thick and silky with butter. Then add the parsley and thyme check for salt and pepper, and serve.
Recipe adapted from Abra Berens, Ruffage: A Practical Guide to Vegetables (2019).
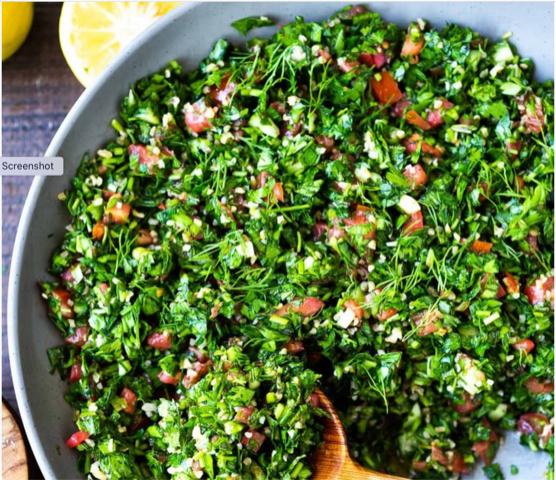
Rebecca’s Recipe of the Week: Lebanese Tabouli
When I was growing up, tabouli formed part of my father’s very limited cooking repertoire, alongside steak tartare and chicken marsala. The recipe he used called it ‘non-lettuce salad’, and that’s a good description of this blend of parsley, mint, tomatoes, cucumbers and a little bulgar wheat. I dedicate this recipe to him!
The secret to this tabouli is the Lebanese 7-spice blend. For an absolute feast, serve it with Lebanese 7-spice chicken. It’s pretty good on its own, too.
Lebanese Tabouli
Serves 4
Ingredients
7 Spice Blend Ingredients
1 teaspoon ground coriander
1 teaspoon cumin
1 teaspoon cinnamon
1 teaspoon ground allspice
1/2 teaspoon grated nutmeg
1/2 teaspoon ground cloves
1/2 teaspoon ground cardamom
Tabouli ingredients
250ml dry medium grain bulgar wheat
4 spring onions
1 large bunch flat-leaf parsley
1 cup mint leaves
1 small bunch dill
3 medium tomatoes
1 cucumber
1 tablespoon lemon zest
70ml lemon juice, or to taste
125ml cup olive oil
1 teaspoon salt
1 teaspoon 7-Spice mix
Preparation
First prepare the 7-spice blend. This will make more than you need for the tabouli, but that shouldn’t be a problem since it’s so delicious. You can add it to lots of other things, including this splendid Lebanese 7-spice chicken. To make the blend combine all the ingredients together. If you want really to go to town with it, you can roast whole coriander and cumin seeds and then grind them, before combining with the other ingredients. This gives an added warm depth to the spice blend.
To make the salad, first prepare the bulgar wheat. Put it in a small bowl and pour 250ml boiling water over it. Cover with a plate, and set aside for at least 30 minutes while you prepare the rest of the salad. This allows the grains to soften.
Slice the spring onion and place in a large serving bowl.
Chop the parsley as fine as you can. It’s ok to include the thinner stems. Add to the bowl. Chop the mint and dill and add them as well.
Dice the tomatoes and cucumbers into small cubes and add them to the bowl, along with all their juices.
Add the lemon zest, lemon juice, olive oil, salt and 1 teaspoon of the 7-spice mix. Give it all a good stir.
By now 30 minutes have probably passed, so the bulgar wheat should be al dente. Once it is, add it to the salad as well and mix again.
If you have time, let the salad sit for a few hours to allow the flavours to meld. The parsley will soften and the bulgar will soak up the flavourful juices. It will in any event be very good the next day if there is any left over.
Before serving, give a stir and taste for salt, lemon and 7-spice. Adjust to your liking. Slyvie Fountaine, whose recipe this is, says ‘You want just the faintest whiff of the spices, like a whisper’.
Recipe adapted from Sylvia Fountaine, ‘Feasting at Home’. https://www.feastingathome.com/lemony-tabouli-aka-tabbouleh/
Rebecca’s Recipe of the Week: Why Eat Normal Things When You Can Eat Weird Things?
A while ago I tried a recipe for whole broad beans cooked in a tomato sauce, and it was pretty good. It set me thinking whether you could actually cook the normally-discarded pods (husks?) that are left over when you shell broad beans. It turns out you can. I mentioned this to several friends, who variously told me I’d gone nuts, or that it sounded like the sort of thing people eat in Siberia. What can I say? I thought it was pretty good. We ate this with brown rice and a topping of salted yoghurt, and a shredded carrot salad on the side.
If you would like a normal recipe for broad beans, I strongly recommend this one: spaghetti with broad beans, bread crumbs and marjoram.
Broad Bean Stew
Serves 2
Ingredients
2 tablespoons olive oil
1 large onion, peeled and sliced
Salt and pepper
Leftover husks from about 500g young broad beans (that’s about 300g of broad-bean husks)
Juice of half a lemon
2-3 tablespoons fresh herbs (I used lemon thyme, sage, and dill)
½ cup water
Preparation
Heat the olive oil over low heat and add the sliced onion and a pinch of salt. Cook for 10 minutes, until the onion is soft but not brown.
Meanwhile assess the broad bean husks. You want bright, green, fresh-looking ones. Discard any that look discoloured. Remove any stringy bits along the sides, rather as you’d remove the strings from off the sides of runner beans. Cut the husks into 1-inch pieces.
Add the broad beans to the onions, stir, and cook for a minute.
Add the water, stir, cover, and simmer gently for about 15 minutes, or until the husks are tender. Top up with more water if it seems to be drying out.
Once the husks are tender, add the fresh herbs and lemon juice, and season with freshly-ground black pepper.
If you wish, you can also mix in some cooked broad beans, to make a double-broad-bean stew.
Serve on brown rice with a topping of salted yoghurt mixed with preserved lemon (if you happen to have any to hand).
Rebecca’s Recipe of the Week: A Very Elaborate Borscht
In case you have a little time on your hands just now, here is an excellent use of a few hours. The result is the best borscht I, at least, have ever tasted. Alissa Timoshkina, whose recipe this is, notes that if you can make the broth 24 hours in advance, ‘you will be rewarded with an even better tasting soup, but a few hours of resting will also do the trick’.
For the red cabbage sauerkraut, I recommend you get in touch with Canalside member Erica Moody, who makes superb sauerkrauts of all sorts.
Borscht
Serves 4
Ingredients
unrefined sunflower oil, for frying and roasting
1 large onion, finely diced
1 carrot, peeled and grated
6 raw beetroots
2 red peppers
2 tablespoons tomato purée
2 litres cold water
2 bay leaves
1 tablespoon black peppercorns
1 tablespoon coriander seeds
1 tablespoon fennel seeds
4 garlic cloves, peeled
bunch of dill
small bunch of flat leaf parsley
2 garlic cloves, grated
500g red cabbage sauerkraut
2 tablespoons pomegranate molasses
1 red onion
1 tablespoon brown sugar
400g can red kidney beans
2 teaspoons smoked paprika
4 tablespoons soured cream
salt
Preparation
Heat up a tablespoon of sunflower oil in a large pan and fry the onion and carrot for about 8 minutes until golden. Meanwhile, peel and grate 2 of the beetroots and core, deseed and thinly slice 1 red pepper. Add the vegetables to the pan together with the tomato purée and a splash of water. Season with salt to taste and fry for a further 5–8 minutes.
Top with the measured cold water, add the bay leaves along with the peppercorns and all the seeds, whole garlic cloves and half the bunches of dill and parsley. Season with a tablespoon of salt and bring to the boil. Reduce the heat, add the grated garlic and half the sauerkraut with its brine and simmer, covered, over a low heat for 40 minutes–1 hour.
Turn off the heat and let the borscht rest for another hour, while you prepare the rest of the elements.
So far, so good, but here is where the recipe starts to deviate from the norm quite a lot: to prepare the vegetables that will grace the plate and also add extra flavour and texture to the soup, you will need to do a bit of roasting.
Start by preheating the oven to 160°C fan/Gas Mark 4. Peel the remaining 4 beetroots, cut into wedges and dress with oil, salt and the pomegranate molasses. Peel the red onion, cut into wedges and season with salt and the brown sugar to bring out their sweetness and promote caramelization. Place on a roasting tray with the beetroot and roast together for 30 minutes. Drain the kidney beans, then dress them with salt, oil and the smoked paprika. Core and deseed the remaining red pepper, then cut into thin strips and dress with salt and oil. Roast the beans and pepper together, as they will need only 10–15 minutes.
When ready to serve, strain the broth through a sieve or a muslin cloth, discarding the solids. All we need is that rich broth! Reheat again if necessary. Next, create layers of texture and flavour in each bowl by adding a heaped tablespoon of the remaining sauerkraut to each, as well as a handful of roasted beetroot, onion, kidney beans and red pepper. Top each bowl with the hot broth and add a dollop of soured cream and a generous sprinkle of the remaining dill and parsley, chopped. The intensity of the flavours and textures of this dish is beyond words, while the look of the bowl will seduce the eye without a doubt.
Recipe from Alissa Timoshkina, Salt & Time: Recipes from a Russian Kitchen (2019).